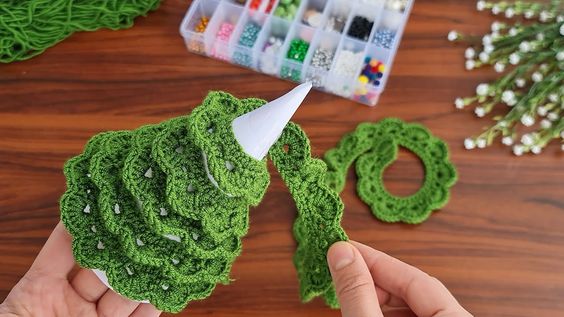
If you’re looking for an easy and festive project, these crochet mini Christmas tree ornaments are perfect for beginners.
With simple stitches and easy-to-follow instructions, you can create adorable holiday decor to hang on your Christmas tree, give as gifts, or even use as part of holiday table settings.
In this guide, you’ll learn how to crochet a small Christmas tree ornament, complete with step-by-step instructions and tips for customizing your decorations.

Materials Needed
Before you begin, gather the following materials:
- Green yarn: Any medium-weight yarn works well for these ornaments. Green is traditional, but you can use any color to match your holiday decor.
- Brown yarn: For the trunk of the tree.
- Hook size: Typically, a 3.5mm or 4mm crochet hook works well with medium-weight yarn.
- Scissors
- Yarn needle: For weaving in the ends.
- Optional embellishments: Mini pom-poms, small beads, or buttons to decorate the trees.
Stitches and Abbreviations
Here’s a quick reference for the stitches used in this pattern:
- ch: Chain
- sc: Single crochet
- dc: Double crochet
- sl st: Slip stitch
- inc: Increase (make two stitches in the same stitch)
- FO: Finish off
If you’re new to these stitches, practice them briefly before starting the project. These are beginner-friendly stitches, so you’ll catch on quickly.
Crochet Mini Christmas Tree Pattern
This pattern will walk you through creating a small Christmas tree in separate layers, which give it a realistic, tiered appearance. Let’s get started!
Step 1: Begin the Tree Base (First Layer)
- Start with a magic ring, or alternatively, ch 4 and join with a sl st to form a ring.
- Round 1: Ch 1, make 6 sc in the ring. Join with a sl st to the first sc. (6 sts)
- Round 2: Ch 1, inc in each stitch around (2 sc in each sc). Join with a sl st. (12 sts)
- Round 3: Ch 1, 1 sc in the first stitch, inc in the next stitch, repeat from * to * around. Join with a sl st. (18 sts)
- Round 4: Ch 1, sc in each stitch around. Join with a sl st. (18 sts)
- Round 5: Ch 1, 1 sc in each of the next 2 stitches, inc in the next stitch, repeat from * to * around. Join with a sl st. (24 sts)
Fasten off and set aside. This is the widest tier of the tree.
Step 2: Make the Middle Layer
- Start with a magic ring or ch 4 and join with a sl st to form a ring.
- Round 1: Ch 1, make 6 sc in the ring. Join with a sl st. (6 sts)
- Round 2: Ch 1, inc in each stitch around. Join with a sl st. (12 sts)
- Round 3: Ch 1, 1 sc in the first stitch, inc in the next stitch, repeat from * to * around. Join with a sl st. (18 sts)
- Round 4: Ch 1, sc in each stitch around. Join with a sl st. (18 sts)
Fasten off. This forms the middle layer of the tree.
Step 3: Make the Top Layer
- Start with a magic ring or ch 4 and join with a sl st to form a ring.
- Round 1: Ch 1, make 6 sc in the ring. Join with a sl st. (6 sts)
- Round 2: Ch 1, inc in each stitch around. Join with a sl st. (12 sts)
- Round 3: Ch 1, 1 sc in each of the next 2 stitches, inc in the next stitch, repeat from * to * around. Join with a sl st. (16 sts)
Fasten off. This creates the smallest tier at the top of the tree.
Step 4: Make the Tree Trunk
Switch to brown yarn for the trunk.
- Foundation: Ch 6.
- Row 1: Starting in the second ch from the hook, sc in each stitch across. (5 sts)
- Rows 2-4: Ch 1, turn, sc in each stitch across. (5 sts)
Fasten off, leaving a long tail for sewing.
Step 5: Assemble the Tree
With your tree layers complete, it’s time to stack and sew them together.
- Position the pieces: Stack the layers with the largest layer on the bottom and the smallest on top.
- Sewing: Use a yarn needle and the long tails left from each layer to sew them together through the center. Pull the yarn tightly to keep the layers stacked closely.
- Attach the trunk: Place the trunk at the bottom of the tree. Use the long tail of yarn to sew it securely to the base of the tree.
Step 6: Decorate Your Tree (Optional)
For a festive touch, you can decorate your mini Christmas tree with any of the following:
- Mini pom-poms: Attach small pom-poms as “ornaments” on the branches.
- Beads or buttons: Sew tiny beads onto the tree for a more delicate look.
- Ribbon or yarn bows: Add a small bow on the top layer as a tree topper.
Simply stitch or glue these decorations onto the tree as desired.
Step 7: Add a Hanging Loop (Optional)
If you want to hang your mini Christmas tree as an ornament:
- Cut a small piece of yarn (about 4 inches) and thread it through the top of the tree.
- Tie the ends together in a knot to create a loop.
Tips for Customizing Your Mini Christmas Trees
- Experiment with Colors: While green is the traditional color for Christmas trees, feel free to use different colors for a fun twist. White, red, or even sparkle yarns can create a unique look.
- Adjust Size: You can make larger or smaller trees by adjusting the number of rounds in each layer. Simply add or reduce rounds to create different sizes.
- Add Fragrance: Try adding a small amount of holiday-scented essential oil to the finished ornament for an extra festive touch.
Final Thoughts
Crochet mini Christmas tree ornaments are not only adorable but also easy to make, even for beginners.
These ornaments are wonderful gifts, beautiful decorations, and can be customized to match your holiday style. The best part? They’re quick to make, so you can create a whole forest of mini trees in no time!
Happy crocheting, and may your holiday season be filled with handmade charm! 🎄


