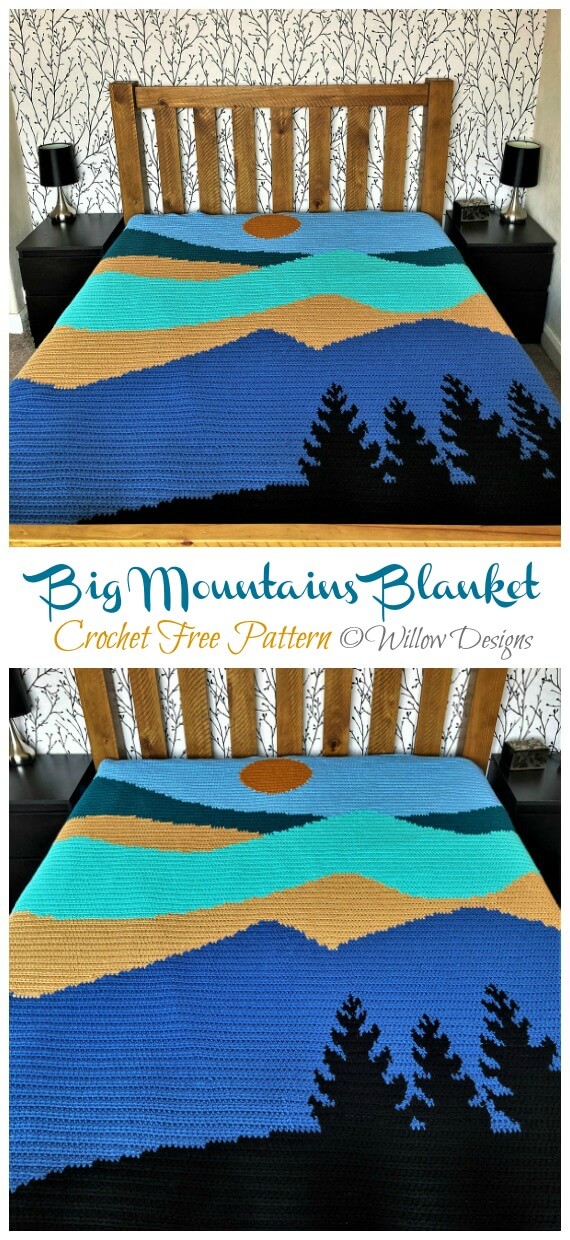
Se você é uma amante de crochê que também se inspira na natureza, prepare-se para se apaixonar pelo cobertor Big Mountains .
Este projeto aconchegante captura a beleza de montanhas majestosas e céus abertos usando pontos simples e blocos de cores.
É a peça perfeita para presentear, decorar sua casa ou, sejamos honestos, guardar só para você ❤

✨ Sobre o Padrão
Inspirado em cadeias de montanhas pitorescas e tons suaves e naturais, este cobertor combina blocos de cores com pontos básicos para criar uma paisagem moderna e reconfortante.
Este padrão é perfeito para iniciantes avançados ou crocheteiras intermediárias que buscam um projeto relaxante e visualmente impressionante.
🧶 Materiais
-
Fio: Fio de lã penteada (#4) – acrílico ou lã
-
Cores sugeridas:
-
Azul escuro (céu noturno)
-
Azul claro (céu diurno)
-
Branco ou cinza claro (picos nevados)
-
Cinza médio ou marrom (montanhas)
-
Verde ou bege (liso ou base)
-
-
Agulha: 5,0 mm (ou apropriada para o seu fio)
-
Tesoura e agulha de tapeçaria
-
Marcadores de ponto (opcional)
🧵 Pontos usados
-
Corrente (ch)
-
Ponto baixo (pb)
-
Ponto alto (pb)
-
Diminuição de ponto alto duplo (pb2j)
📏 Tamanho finalizado (aprox.)
47″ x 59″ (120 cm x 150 cm) — facilmente ajustável adicionando mais correntes ou fileiras.
🗻 Passo a passo – Manta Big Mountains
1. Fundação (Céu Inferior)
-
Usando fio azul claro , faça 120 correntinhas (ou um múltiplo de 20 para a largura desejada).
-
Vire e faça 1 ponto alto (pb) em cada ponto.
-
Continue com 8 a 10 carreiras na mesma cor para a seção do céu.
2. Criando as Montanhas – Parte 1
-
Mude para o fio cinza médio .
-
Para moldar as montanhas:
-
Faça uma repetição de 5 pb seguidos de 1 pb2j.
-
Repita essa sequência em toda a carreira.
-
-
Nas próximas carreiras, diminua o número de pb entre as diminuições para formar picos triangulares:
(por exemplo, 4 pb + pb2j, depois 3 pb + pb2j, e assim por diante). -
Isso cria o formato triangular da montanha que se eleva a partir da base.
3. Picos nevados
-
À medida que você se aproxima do topo de cada triângulo, troque para fio branco ou cinza claro .
-
Adicione 1–2 fileiras de branco nas pontas dos triângulos para criar um efeito de pico nevado.
-
Continue diminuindo para finalizar os picos.
4. Segunda Camada de Montanha
-
Abaixo da primeira cadeia de montanhas, repita o mesmo padrão com outra cor (marrom ou cinza escuro) para criar uma segunda camada de montanhas.
-
Isso acrescenta profundidade e riqueza à sua paisagem!
5. Seção do céu noturno
-
Depois de terminar as montanhas, mude para o fio azul escuro .
-
Faça mais 8 a 10 carreiras em pb para a parte do céu noturno.
-
Para um toque mágico, borde pequenas “estrelas” usando fio branco depois que o cobertor estiver pronto.
6. Toques finais
-
Entrelace todas as pontas do fio com uma agulha de tapeçaria.
-
Opcionalmente, adicione uma borda simples de crochê ao redor de todo o cobertor.
-
Bloqueie o cobertor se necessário para uniformizar os pontos e melhorar o formato.
💡 Dicas extras
-
Faça um esboço do layout da sua montanha ou use papel quadriculado antes de começar — isso realmente ajuda!
-
Tons pastéis suaves criam um visual relaxante; cores fortes dão um toque mais moderno.
-
Quer um cobertor maior? Adicione mais correntes à fileira inicial e repita o padrão da montanha.
📸 Compartilhe seu trabalho!
Se você fizer seu próprio Big Mountains Blanket, não esqueça de compartilhar sua obra-prima nas redes sociais com a hashtag #BigMountainsBlanket — e marque sua inspiração! É sempre incrível ver como cada versão se torna uma expressão única de amor e criatividade 💖


