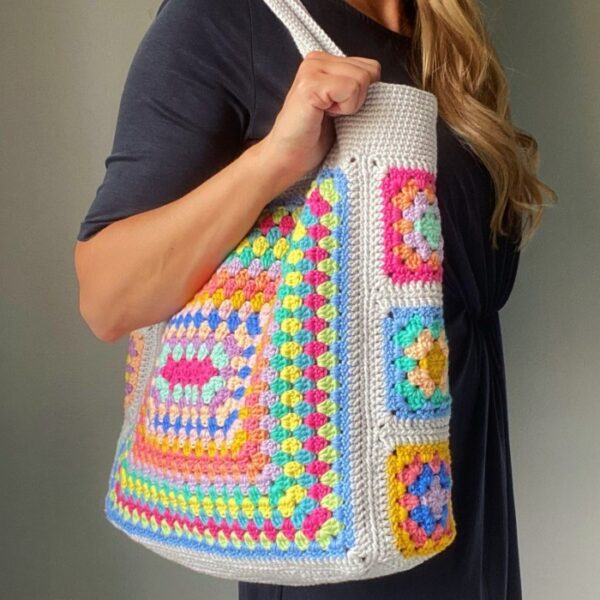
Crochet offers a multitude of creative possibilities, allowing the creation of unique and personalized pieces. A versatile and charming project is the bag made with crochet squares. In this article, we will explain step by step how to make a bag using this technique. Prepare your threads, needles and creativity to create a unique and functional bag.
Necessary materials:
Before starting the project, gather the necessary materials:
- Wool or cotton yarn of your choice, in assorted colors.
- Crochet hook suitable for the chosen yarn size.
- Scissors.
- Thread and sewing needle.
- Ready-made bag handles or materials to make the handles, such as leather, rope, or chains.

Step 1: Choosing Colors and Yarns
Before you start crocheting the squares, choose the yarns and colors that will be used for your bag. You can opt for a harmonious color palette or create a more vibrant, contrasting effect. Use your creativity to choose the combinations that suit you best.
Step 2: Crochet Squares
Start by crocheting the squares that will be joined together to form the bag. Choose a crochet stitch you like, such as the double crochet or single crochet, and make a square the size you want your purse to be. You can vary the size of the squares, creating a unique and personalized design.
Make as many squares as necessary to achieve the desired width and height for the bag. Remember to make the same number of squares for the front and back of the bag.
Step 3: Joining the Squares
With the squares ready, it’s time to unite them to form the parts of the bag. Use the thread and sewing needle to sew the squares side by side. Be sure to line them up correctly to create a clean, even finish.
You can choose to join the squares in a single row or form columns and rows, depending on the design you want to create. Try different options to find the style that suits you best.
Step 4: Sewing the Sides and Base
After joining the squares, it is necessary to sew the sides and the base of the bag. Fold the piece in half, right side of the squares facing inward, and use the sewing thread and needle to sew the sides together. Then sew the base of the bag, leaving the top open.
Be sure to sew on tight, reinforced seams to ensure the bag is sturdy and durable.
Step 5: Bag Handles
Now, it’s time to add the handles to your crochet square bag. You can use ready-made handles or create your own handles with materials such as leather, rope, or chains.
If you opt for ready-made handles, just attach them to the sides of the bag, following the instructions provided by the manufacturer. Make sure the straps are securely attached and can support the weight of the bag.
If you prefer to make your own handles, measure the desired length and cut the chosen material. Drill small holes on the sides of the bag where the handles will attach, and thread the material through the holes. Use a needle and thread to sew the ends of the straps to the bag, ensuring they are secure and secure.
Step 6: Finishes and Details
To make your crochet square bag even more special, you can add decorative details and trim. This can include crocheted borders, pom poms, fringe, buttons, flowers, or any other element that reflects your personal style.
Let your imagination run wild and experiment with different techniques to make your bag unique and personalized.
Step 7: Caring for the Bag
After finalizing your crochet square bag, it is important to take some precautions to ensure its durability. Check the washing instructions for the yarn used and wash it according to the recommendations. If you prefer, you can wash the bag by hand using cold water and mild soap.
Avoid hanging the bag by the cable or handles, as this can deform the structure. Store it in an airy place, protected from moisture and direct sunlight.
Conclusion:
Creating a bag using crochet squares is a creative and rewarding way to express your craftsmanship and personal style. By following the steps above, you’ll be ready to make a unique and functional bag that is sure to turn heads and garner compliments. Remember to adapt the square pattern, colors, finishes and details to your preferences, and enjoy the experience of creating a unique piece that combines style and functionality.


