


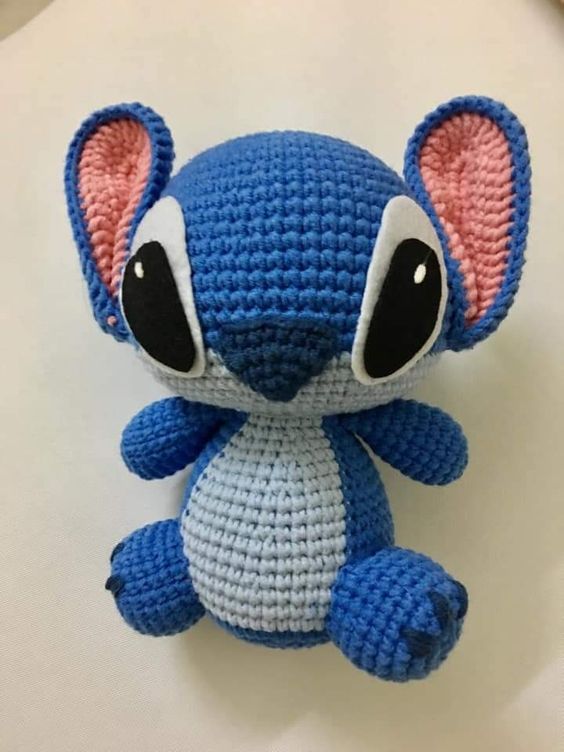
Crocheting character amigurumi is a fun and rewarding project, especially when it involves creating a beloved character like Stitch from Disney’s “Lilo & Stitch.”
His adorable features and playful personality make him a favorite among crafters.
In this article, we’ll guide you through the process of making your own crochet version of Stitch, with a detailed step-by-step pattern designed for beginners. Let’s get started!
Materials Needed
Before diving into the pattern, make sure you have all the materials needed to create your Stitch crochet figure.
- Yarn:
- Blue yarn for the body (choose a medium shade for accuracy)
- Darker blue yarn for accents (e.g., belly, eyes)
- Pink yarn for inner ears
- Black and white yarn for the eyes and nose
- Crochet Hook: Size 3.5mm (E) or a size appropriate for your yarn weight.
- Fiberfill Stuffing: To fill the body, arms, legs, and head.
- Tapestry Needle: For sewing parts together and weaving in ends.
- Safety Eyes or Embroidery Thread: For eyes (or you can crochet them with black and white yarn).
- Scissors: To cut yarn as needed.
- Stitch Markers (optional): These can help keep track of rounds.
Abbreviations (US Terms)
- ch: Chain
- sc: Single crochet
- inc: Increase (2 sc in the same stitch)
- dec: Decrease (single crochet 2 stitches together)
- st: Stitch
- sl st: Slip stitch
- FO: Fasten off
Pattern Overview
The Stitch crochet pattern is divided into several parts: the head, body, arms, legs, ears, and tail. You will crochet each piece separately and then assemble them to form your finished character.
Head
Round 1:
- Start with a magic ring and work 6 sc into the ring. (6 stitches)
Round 2:
- Inc in each st around. (12 stitches)
Round 3:
- Sc in the next st, inc in the next st, repeat from * to * around. (18 stitches)
Round 4:
- Sc in the next 2 sts, inc in the next st, repeat from * to * around. (24 stitches)
Round 5:
- Sc in the next 3 sts, inc in the next st, repeat from * to * around. (30 stitches)
Round 6-10:
- Sc in each st around. (30 stitches)
Round 11:
- Sc in the next 3 sts, dec in the next st, repeat from * to * around. (24 stitches)
Round 12:
- Sc in the next 2 sts, dec in the next st, repeat from * to * around. (18 stitches)
Round 13:
- Sc in the next st, dec in the next st, repeat from * to * around. (12 stitches)
Stuff the head with fiberfill.
Round 14:
- Dec in each st around. (6 stitches)
Fasten off, leaving a long tail for sewing.
Body
Round 1:
- Start with a magic ring and work 6 sc into the ring. (6 stitches)
Round 2:
- Inc in each st around. (12 stitches)
Round 3:
- Sc in the next st, inc in the next st, repeat from * to * around. (18 stitches)
Round 4:
- Sc in the next 2 sts, inc in the next st, repeat from * to * around. (24 stitches)
Round 5-10:
- Sc in each st around. (24 stitches)
Round 11:
- Sc in the next 2 sts, dec in the next st, repeat from * to * around. (18 stitches)
Round 12:
- Sc in the next st, dec in the next st, repeat from * to * around. (12 stitches)
Stuff the body with fiberfill.
Round 13:
- Dec in each st around. (6 stitches)
Fasten off, leaving a long tail for sewing. Set aside for later assembly.
Arms (Make 2)
Round 1:
- Start with a magic ring and work 6 sc into the ring. (6 stitches)
Round 2:
- Inc in each st around. (12 stitches)
Round 3-5:
- Sc in each st around. (12 stitches)
Round 6:
- Sc in the next 2 sts, dec in the next st, repeat from * to * around. (9 stitches)
Stuff the arms lightly.
Round 7:
- Sc in each st around. (9 stitches)
Fasten off, leaving a long tail for sewing.
Legs (Make 2)
Round 1:
- Start with a magic ring and work 6 sc into the ring. (6 stitches)
Round 2:
- Inc in each st around. (12 stitches)
Round 3-4:
- Sc in each st around. (12 stitches)
Round 5:
- Sc in the next 2 sts, dec in the next st, repeat from * to * around. (9 stitches)
Stuff the legs lightly.
Round 6:
- Sc in each st around. (9 stitches)
Fasten off, leaving a long tail for sewing.
Ears (Make 2)
Round 1:
- Start with a magic ring and work 6 sc into the ring. (6 stitches)
Round 2:
- Inc in each st around. (12 stitches)
Round 3-7:
- Sc in each st around. (12 stitches)
Round 8:
- Sc in the next st, dec in the next st, repeat from * to * around. (8 stitches)
Fasten off, leaving a long tail for sewing. Use the pink yarn to crochet the inner ear by following the same steps but with fewer rounds to create a smaller piece. Sew the pink inner ear onto the main ear.
Tail
Round 1:
- Start with a magic ring and work 6 sc into the ring. (6 stitches)
Round 2:
- Inc in each st around. (12 stitches)
Round 3-4:
- Sc in each st around. (12 stitches)
Stuff the tail lightly.
Round 5:
- Dec in each st around. (6 stitches)
Fasten off, leaving a long tail for sewing.
Assembly
Now that you have all the parts ready, it’s time to assemble Stitch.
- Attach the Head to the Body: Use the long tail from the head to sew it onto the top of the body. Make sure it’s securely attached.
- Attach the Arms and Legs: Sew the arms onto the sides of the body, slightly below the head. Attach the legs to the bottom of the body.
- Attach the Ears: Sew the ears onto the top sides of the head. Make sure they are positioned evenly.
- Attach the Tail: Sew the tail onto the back of the body.
- Add the Eyes and Nose: If using safety eyes, insert them now. Alternatively, crochet small black circles for the eyes and sew them onto the head. Use black yarn to embroider the nose in the center of the face.
Final Touches
Once all parts are attached, take a moment to adjust the stuffing if needed and make sure everything is securely sewn. You can also embroider any additional details, such as Stitch’s belly or claws on his paws, using darker yarn.
Conclusion
Crocheting Stitch is a delightful project that brings this beloved character to life in yarn form. The pattern is beginner-friendly, with basic stitches and simple assembly steps.
Whether you’re making Stitch for yourself or as a gift, this project is sure to bring a smile to anyone’s face. Take your time, enjoy the process, and have fun creating your own version of Stitch! Happy crocheting!


")