


The Poinsettia flower — also known as the Christmas Flower — is one of the most iconic symbols of the holiday season.
Its elegant shape and vibrant petals brighten any decoration: Christmas trees, wreaths, table arrangements, gift wrapping, and even blankets or accessories.
In this article, you’ll find a complete, original, and easy crochet pattern to create your own Poinsettia.
This project is great for confident beginners and experienced crafters who want a delicate and charming piece.
🧶 Materials Needed
-
Fine or medium-weight yarn in:
-
Red (petals)
-
Green (leaves – optional)
-
Yellow or gold (center)
-
-
Crochet hook appropriate for the yarn (usually 2.5 mm to 3.5 mm)
-
Scissors
-
Tapestry needle
-
Craft glue or starch (optional for stiffening)
Crochet Poinsettia Flower Pattern – Step by Step
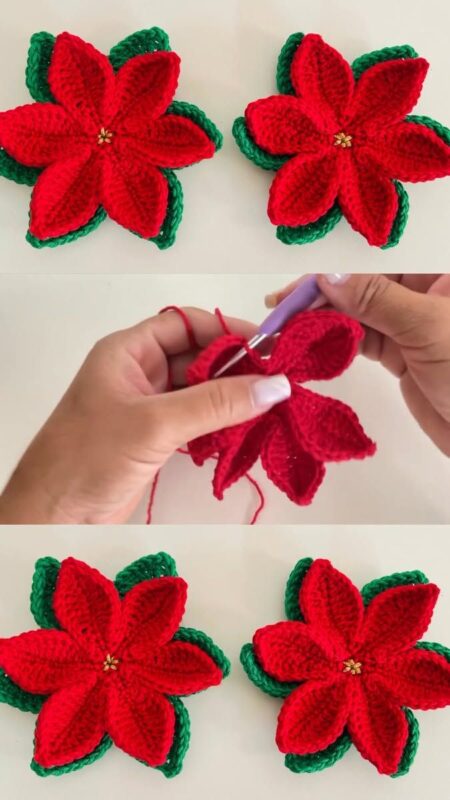
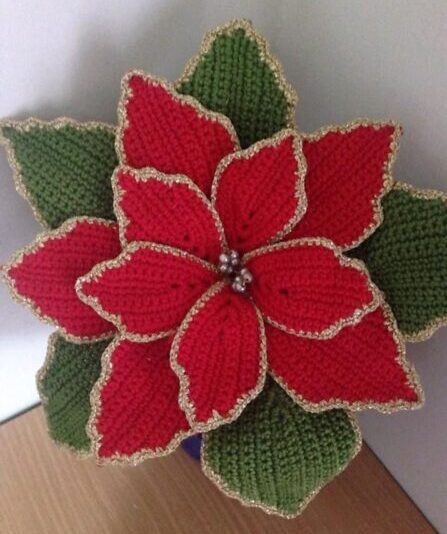
The flower is made of two layers of petals, plus optional leaves and a center.
🔺 Part 1 — First Layer of Petals (Red)
-
Magic ring
Make a magic ring and chain 3 (counts as your first double crochet). -
Inside the ring:
-
1 double crochet
-
2 chains
Repeat this sequence 6 times.
-
-
Pull the ring tight to close and slip stitch into the top of the beginning chain-3.
You now have 6 chain spaces. -
Petals:
In each chain space:-
1 single crochet
-
1 half double crochet
-
3 double crochets
-
1 half double crochet
-
1 single crochet
-
-
Repeat for all 6 petals.
Fasten off the yarn.
🔺 Part 2 — Second Layer of Petals (Red)
This layer adds depth and fullness to the flower.
-
Attach red yarn on the back of the first layer, between the petals.
-
Make:
-
1 single crochet
-
2 chains
Repeat this between each petal to form 6 new spaces.
-
-
In each space:
-
1 sc
-
1 hdc
-
3 dc
-
1 hdc
-
1 sc
-
-
Repeat for all 6 new petals, then fasten off.
Now your Poinsettia has two beautiful, detailed layers.
🍃 Part 3 — Green Leaves (Optional but beautiful!)
-
With green yarn, join on the back of the flower between the second-layer petals.
-
Create 6 spaces again:
-
1 single crochet
-
3 chains
-
-
In each space:
-
1 sc
-
1 hdc
-
4 dc
-
1 hdc
-
1 sc
-
The leaves should be slightly larger than the petals for a natural contrast.
✨ Part 4 — Center of the Flower (Yellow or Gold)
Choose one of the options below:
Simple center:
-
Make 6 single crochets into a magic ring, pull to close, and sew to the center.
Textured center (realistic):
-
Make 6 popcorn stitches using double crochet.
-
Join them into a small circle.
-
Sew to the flower’s center.
🎄 How to Use Your Crochet Poinsettia
You can apply your flower to:
-
Christmas wreaths
-
Tree ornaments
-
Gift wrapping
-
Table runners
-
Blankets
-
Door decor
-
Hair clips or brooches
Tip: stiffen the flower with starch for a crisp and festive look.
💡 Extra Tips
-
Use metallic yarn for a sophisticated holiday sparkle.
-
Make different sizes for layered arrangements.
-
Try alternative colors like white, gold, burgundy, and olive green.
🌟 Conclusion
The Crochet Poinsettia Flower is an elegant, quick, and versatile Christmas project. It adds a handmade touch to your holiday décor and makes a lovely gift. With this step-by-step pattern, you can create as many as you like and customize them to your style.
")
")
