


If you’re looking for a cozy, textured stitch that is both beginner-friendly and visually striking, the 5 Double Crochet Shell Stitch is a perfect choice.
Its soft, rounded clusters create a dense fabric that works wonderfully for blankets, scarves, baby gifts, and home décor.
This extended guide will walk you through everything you need to know to create your own shell stitch blanket from start to finish.
What Makes the Shell Stitch Special?
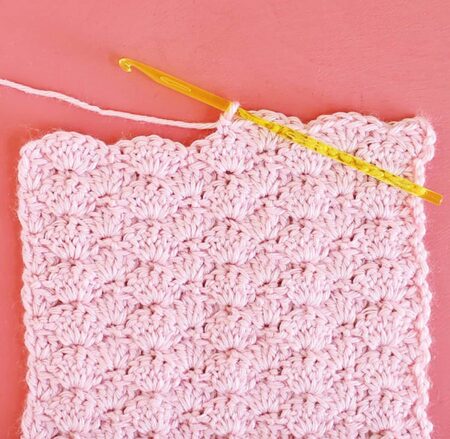
The Shell Stitch is formed by working a cluster of five double crochets into a single stitch. As these shells line up across the fabric, they create a beautiful flow of curves and waves.
Although the design looks intricate, the technique is easy to master. After just a few rows, the rhythm becomes relaxing and almost meditative.
In addition, this stitch is extremely versatile. Whether you prefer solid colors or dramatic ombré transitions, the shell stitch enhances both beautifully.
Materials You Will Need
Before you begin, gather the following supplies:
- Yarn: Worsted-weight (medium #4) or ombré yarn
- Hook: 5.0 mm or 5.5 mm
- Notions: Scissors and a tapestry needle
- Gauge: Not essential for this project
Worsted-weight yarn is recommended because it gives the shells great definition without making the blanket too heavy.
Foundation Chain Multiple
To ensure the stitch pattern aligns correctly, start with:
➡️ A foundation chain in multiples of 6 + 1
This keeps the stitch repeat balanced throughout the blanket.
Suggested Chain Counts
| Blanket Size | Starting Chains |
|---|---|
| Small Throw | 121 chains |
| Medium | 145 chains |
| Large | 169 chains |
If you want a custom size, simply adjust your chain count according to the stitch multiple.
Stitch Abbreviations (US Terms)
- ch – chain
- dc – double crochet
- shell – 5 dc worked into the same stitch
Shell Stitch Blanket Pattern
Row 1 – Establishing the First Shells
Begin with your foundation chain. Then, work 5 dc into the 4th chain from the hook to create your first shell.
Next, skip 2 chains, place 1 dc in the next chain, skip 2 more chains, and work another shell in the next stitch.
Continue this sequence all the way across the row. Once you reach the end, place 1 dc in the final chain. This creates a neat, straight edge.
Row 2 – Building the Pattern Structure
Turn your work and make ch 3; this counts as your first dc.
Locate the center stitch of the shell from the previous row — the third dc in the cluster — and create a new shell there.
Then, dc into the single dc that separates each shell pattern.
Repeat this shell-and-dc sequence across the row.
To finish, place 1 dc on top of the turning chain.
Row 3 and Remaining Rows – Growing the Fabric
For the rest of the blanket, simply repeat Row 2.
Because each new shell is worked into the center of the shell below, the design builds upward in a clean, organized pattern.
As the fabric grows, the texture becomes more defined, giving the blanket a plush and luxurious feel.
Helpful Tips for a Clean Finish
✔ Keep Your Tension Even
Consistent tension is key to maintaining smooth, rounded shells. Uneven stitches may distort the shape.
✔ Choose a Slightly Smaller Hook for a Dense Look
If you prefer a tighter and sturdier texture, try using a hook that is one size smaller than the yarn label suggests.
✔ Ombre Yarn Creates Beautiful Transitions
Because the shells stack in vertical lines, ombré yarn produces long, soft color gradients that look stunning.
✔ Block Your Blanket
A gentle block will help even out the rows and enhance the stitch definition.
Optional Variations
To personalize your blanket even further, try experimenting with:
• 3-Double-Crochet Shells
A lighter, airier version of the pattern with a softer drape.
• Alternating Shell Heights
Mixing 3-dc and 5-dc shells creates a wavy, textured surface.
• Striped Shell Rows
Switch colors every few rows for a scalloped stripe effect.
Common Issues and How to Avoid Them
• Incorrect Foundation Chain Count
Starting with the wrong stitch multiple may cause misaligned shells later. Always check your chain count before beginning.
• Misplaced Center Stitch
Ensure the new shell is always worked into the center (3rd dc) of the shell below. Counting slowly in the first few rows helps.
• Curling Edges
Overly tight tension or a hook that’s too small can make the blanket curl. Adjust your tension or hook size if needed.
Why This Pattern Is Great for Beginners
Although the blanket looks sophisticated, the stitch repeat is simple. Once you understand the shell placement, the pattern becomes predictable and enjoyable.
Additionally, the blanket grows quickly, offering fast visual progress — perfect for crocheters who love relaxing, repetitive projects.
Final Thoughts
A Shell Stitch Blanket is a timeless project that suits every skill level. Its soft, scalloped texture adds elegance and comfort to any room. Whether you choose a bold ombré yarn or a classic solid shade, this pattern delivers stunning results with minimal effort.
This guide provides everything you need to begin your next cozy masterpiece. Now all that’s left is to pick up your hook and start stitching!


