


If you’re searching for a delicate and elegant crochet pattern, the 3D Crochet Leaf Stitch Border is a perfect choice.
Inspired by nature, this stunning design features layered leaves that create a textured and sophisticated finish. Not only is it visually appealing, but it is also surprisingly easy to follow once you understand the basics.
Whether you are embellishing a baby blanket, adding charm to a shawl, or finishing a decorative piece, this crochet leaf edging will elevate your handmade project beautifully.
In this step-by-step tutorial, you will learn how to crochet this intricate yet beginner-friendly pattern with ease.
🌿 Real Name of the Pattern
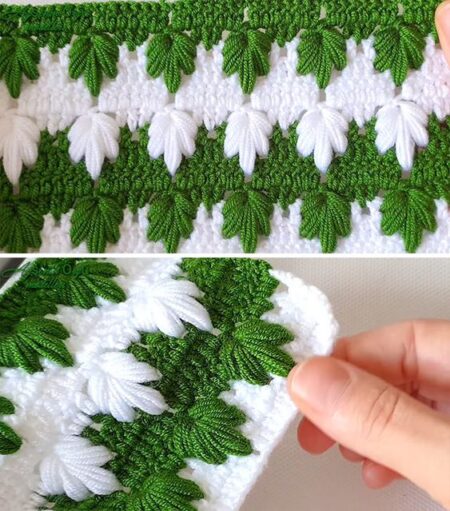
3D Crochet Leaf Stitch Border
Also known as:
- Crochet Leaf Edging
- Irish Crochet Leaf Border
- Crochet Vine Leaf Stitch
- Decorative Leaf Crochet Trim
These names are commonly used across crochet communities and blogs worldwide.
🧶 Materials Needed
Before starting, gather the following supplies:
- Worsted weight yarn (#4) or cotton yarn
- Crochet hook: 3.5 mm – 4.5 mm
- Scissors
- Yarn needle
- Stitch markers (optional)
Suggested Colors
To replicate the look in the image:
- Green for the leaves
- White for the base background
However, you can customize the colors to match your project.
Skill Level
- Level: Beginner to Intermediate
- Techniques Used: Basic stitches and layered leaf construction
- Project Type: Crochet border and decorative stitch pattern
✨ Crochet Abbreviations (US Terms)
- CH – Chain
- SC – Single Crochet
- HDC – Half Double Crochet
- DC – Double Crochet
- TR – Treble Crochet
- SL ST – Slip Stitch
- ST – Stitch
- SP – Space
- SK – Skip
🍃 Step-by-Step Instructions
Step 1: Create the Foundation Row
First, crochet a base using white yarn.
- Chain any multiple of 10 + 2.
- Row 1: Work 1 SC in the second chain from the hook and in each stitch across.
- Turn your work and chain 1.
This row provides a sturdy base for the leaf design.
Step 2: Prepare the Leaf Spaces
Next, create the spaces where the leaves will be formed.
- Row 2: SC in the first stitch.
- Chain 5, skip 4 stitches, SC in the next stitch.
- Repeat from * to * across the row.
- Turn your work.
These chain spaces will form the foundation for the leaves.
Step 3: Crochet the 3D Leaves
Now comes the most beautiful part of the pattern.
Switch to green yarn.
Into each chain-5 space, work the following stitches:
- SC, HDC, DC, TR, DC, HDC, SC
This sequence forms a realistic leaf shape. As a result, the stitch creates a raised, textured effect that resembles natural foliage.
Slip stitch into the next SC to secure the leaf. Repeat across the row.
Step 4: Create Layered Leaves
To achieve the lush and dimensional look shown in the image:
- Work another row of chain spaces above the first layer.
- Alternate the placement of the leaves between rows.
- This creates a cascading vine effect.
Continue repeating the pattern until you reach the desired length.
Step 5: Add the Final Border
For a clean and polished finish:
- Switch back to white yarn.
- Work one row of SC evenly across the top.
- Fasten off and weave in all loose ends.
Your elegant crochet leaf border is now complete!
💡 Tips for Beginners
- Maintain consistent tension to ensure evenly shaped leaves.
- Practice the leaf stitch on a small swatch before starting a large project.
- Use cotton yarn for sharper stitch definition.
- Block your finished piece to enhance its shape and texture.
- Count your stitches at the end of each row for accuracy.
Creative Project Ideas
This versatile crochet leaf stitch can be used in a variety of projects.
👶 For Baby Girls
- Baby blankets in white and sage green
- Floral nursery décor
- Decorative shawls with pastel tones
👶 For Baby Boys
- Blankets in green and cream
- Nature-inspired crib covers
- Forest-themed accessories
🌈 Gender-Neutral Designs
- Ivory and olive baby blankets
- Boho-style throws
- Earth-tone cushion covers
🏡 Home Décor Ideas
- Table runners
- Pillow borders
- Curtain trims
- Wall hangings
Final Thoughts
The 3D Crochet Leaf Stitch Border is a timeless and elegant pattern that brings the beauty of nature into your handmade creations. Although it looks intricate, its step-by-step structure makes it accessible even for beginners.
With patience and practice, you’ll be able to create stunning crochet pieces that are both unique and memorable. So grab your yarn, pick your favorite colors, and start crafting your own leafy masterpiece today!


