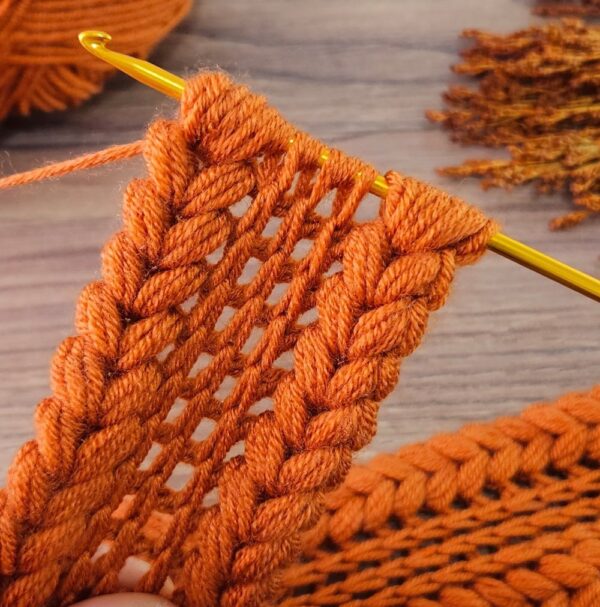
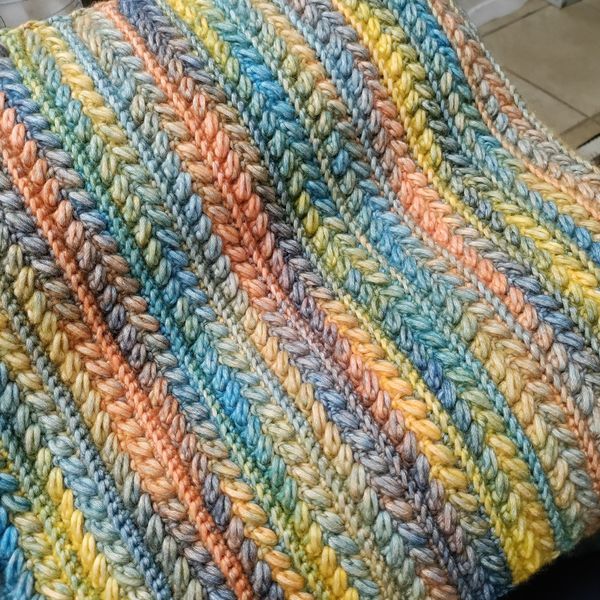
The Wheat Stitch is a classic and elegant crochet pattern that resembles the soft texture of wheat stalks swaying in the field.
It’s a lovely, textured stitch that looks intricate but is actually quite easy to make — perfect for blankets, scarves, sweaters, and even baby clothes.
If you love stitches with texture and want to add a touch of sophistication to your crochet projects, this one’s for you.
What Is the Wheat Stitch?
The Wheat Stitch combines front post double crochets and regular double crochets, creating a raised, braided texture that looks just like tiny wheat grains.
It’s considered an easy to intermediate pattern, ideal for anyone who already knows basic stitches and wants to learn something new.
This tutorial focuses on the crochet version of the Wheat Stitch, but a knitted version also exists. The crochet one is especially beautiful and beginner-friendly.
Materials You’ll Need
- Medium-weight cotton or acrylic yarn
- Crochet hook suitable for your yarn size
- Scissors
- Tapestry needle for weaving in ends
Tip: Use light or neutral colors (like beige, cream, or sand) to highlight the stitch texture and enhance the “wheat” look.
Stitches Used
- Chain (ch)
- Single crochet (sc)
- Double crochet (dc)
- Front post double crochet (fpdc)
Step-by-Step: Wheat Stitch Crochet Pattern
1️⃣ Foundation chain
- Make a chain with an even number of stitches + 1 extra (for example, 21 chains).
This ensures the stitch pattern lines up perfectly.
2️⃣ Row 1
- Skip the first chain from the hook and work 1 single crochet in each chain across the row.
- Turn your work.
3️⃣ Row 2
- Chain 2 (counts as your first dc).
- In the next stitch, make 1 front post double crochet (fpdc):
Insert your hook around the post of the stitch from the previous row (from front to back and to front again), yarn over, pull through, and complete a regular double crochet. - In the next stitch, make a regular double crochet.
- Continue alternating 1 dc, 1 fpdc until the end of the row.
- Turn your work.
4️⃣ Row 3
- Chain 1 and make 1 single crochet in each stitch across.
- Turn again.
5️⃣ Repeat the pattern
- Repeat rows 2 and 3 throughout your project:
- One row of alternating double crochets and front post double crochets.
- One row of single crochets.
This simple repetition creates the beautiful texture that looks just like rows of wheat stalks.
Tips for a Perfect Finish
- Keep your tension loose so the raised stitches show clearly.
- Block your work after finishing — lightly spray with water and lay it flat to shape.
- Try mixing colors for a subtle striped or gradient effect.
- For a chunkier, more rustic look, use bulky yarn and a larger hook.
Project Ideas Using the Wheat Stitch
The Wheat Stitch is perfect for adding warmth and elegance to your handmade creations. Try it in:
- Blankets and throws
- Sweaters or vests
- Pillow covers
- Scarves and cowls
- Table runners or placemats
Its texture adds a cozy, natural touch to any room or outfit — like a bit of handmade sunshine. 🌞
Final Thoughts
The Wheat Stitch is one of those crochet patterns that looks much harder than it actually is. Once you learn the rhythm of alternating stitches, you’ll fall in love with the soft texture and timeless design.
It’s a reminder that, in crochet, beauty often lies in simple repetition and a little patience.
Grab your favorite yarn, take a deep breath, and let your hands create something warm, textured, and full of heart.