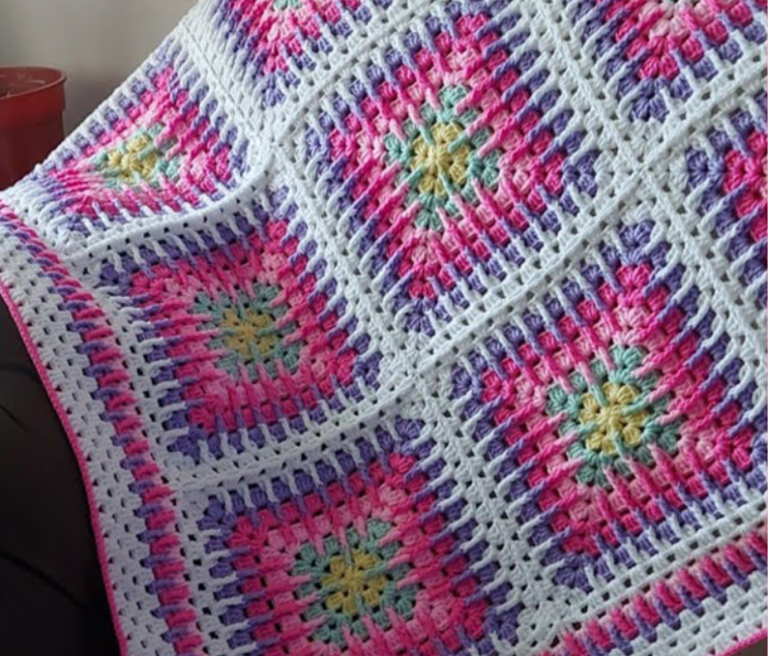
Crocheting a solid granny square blanket is a delightful and rewarding project, especially for beginners.
This pattern is not only easy to follow but also provides a great foundation for learning various crochet techniques.
In this guide, we will walk you through the steps to create your very own solid granny square blanket.

Materials Needed
- Yarn: Choose a medium-weight yarn (worsted weight). You can use a single color or multiple colors for a more vibrant look.
- Crochet Hook: A 5.5 mm (I-9) hook is recommended for medium-weight yarn.
- Scissors: For cutting the yarn.
- Yarn Needle: For weaving in the ends.
Abbreviations
- ch: chain
- sl st: slip stitch
- sc: single crochet
- dc: double crochet
- sp: space
- st(s): stitch(es)
Step-by-Step Instructions
Starting the Square
- Begin with a Slip Knot: Make a slip knot and place it on your hook.
- Foundation Chain: Ch 4 and join with a sl st to form a ring.
Round 1
- Ch 3: (counts as the first dc), then work 2 dc into the ring.
- Ch 2: This forms the first corner.
- Work Clusters: 3 dc into the ring, ch 2 repeat 3 times. You should have four 3-dc clusters with ch-2 spaces between them.
- Close the Round: Join with a sl st to the top of the starting ch-3.
Round 2
- Ch 3: (counts as the first dc), then work 1 dc in the same st.
- Form the Sides: Dc in each of the next 2 dc.
- Corners: In the ch-2 sp, work 2 dc, ch 2, 2 dc.
- Continue Around: Dc in each of the next 3 dc, 2 dc in the ch-2 sp, ch 2, 2 dc repeat 3 times.
- Close the Round: Join with a sl st to the top of the starting ch-3.
Round 3
- Ch 3: (counts as the first dc), dc in the next 4 dc.
- Corners: In the ch-2 sp, work 2 dc, ch 2, 2 dc.
- Continue Around: Dc in each dc along the side, 2 dc in the ch-2 sp, ch 2, 2 dc repeat 3 times.
- Close the Round: Join with a sl st to the top of the starting ch-3.
Rounds 4 and Beyond
- Ch 3: (counts as the first dc), dc in each dc along the side.
- Corners: In each ch-2 sp, work 2 dc, ch 2, 2 dc.
- Continue Around: Follow the same pattern for each side and corner.
- Close the Round: Join with a sl st to the top of the starting ch-3.
Repeat this pattern, adding rounds until your square reaches the desired size. For a blanket, you will need multiple squares.
Assembling the Blanket
- Make Multiple Squares: Create enough solid granny squares to form your blanket. The number will depend on the desired size.
- Join the Squares: Use your preferred method to join the squares. Slip stitch or whip stitch methods work well. Align the squares and join them by sewing or crocheting through the outer loops of the stitches.
Border (Optional)
Once all squares are joined, you can add a border around the entire blanket to give it a finished look.
- Single Crochet Border: Work a round of sc around the blanket, making 3 sc in each corner.
- Double Crochet Border: Follow the single crochet border with a round of dc, again making 3 dc in each corner.
Finishing
- Fasten Off: Once your blanket is complete, cut the yarn, leaving a 6-inch tail. Pull the tail through the loop on your hook and tighten.
- Weave in Ends: Use the yarn needle to weave in any loose ends, securing your work.
Congratulations! You’ve created a beautiful solid granny square blanket. This project is a great way to practice your crochet skills and end up with a cozy, handmade item. Enjoy your new blanket and happy crocheting!


