


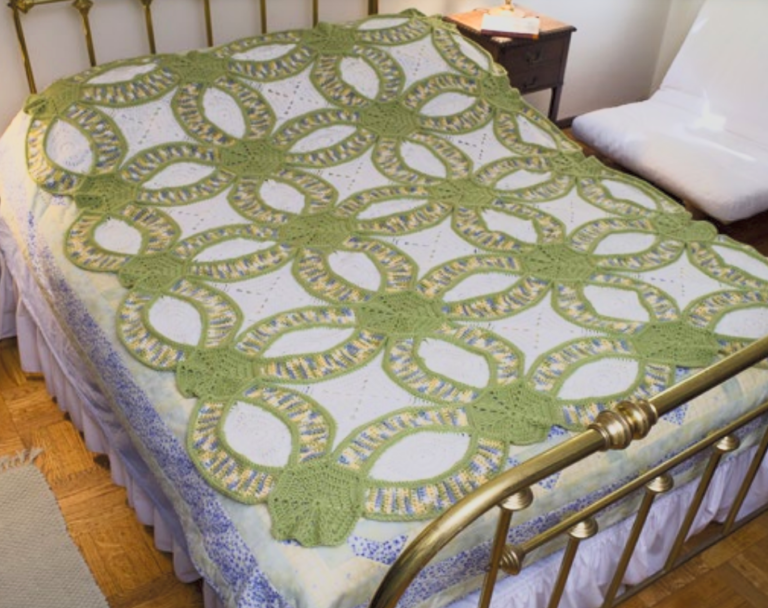
Creating a Wedding Ring Crochet Quilt is a rewarding project that symbolizes unity and love, making it an ideal gift for weddings or anniversaries.
This quilt pattern, known for its intricate and elegant design, is surprisingly approachable for beginners when broken down into manageable steps.
This guide will walk you through the process of creating your very own Wedding Ring Crochet Quilt, providing detailed instructions and helpful tips along the way.
Materials Needed
- Yarn: Choose a medium-weight yarn in multiple colors. Traditionally, wedding ring quilts feature a mix of light and dark shades.
- Crochet Hook: A 5.5 mm (I-9) hook is recommended for medium-weight yarn.
- Scissors: For cutting the yarn.
- Yarn Needle: For weaving in the ends.
- Stitch Markers: Optional, but helpful for keeping track of your rounds and sections.
Abbreviations
- ch: chain
- sl st: slip stitch
- sc: single crochet
- dc: double crochet
- tr: treble crochet
- sp: space
- st(s): stitch(es)
Step-by-Step Instructions
Starting the Ring
- Begin with a Slip Knot: Make a slip knot and place it on your hook.
- Foundation Chain: Ch 4 and join with a sl st to form a ring.
Round 1
- Ch 3: (counts as the first dc), work 11 more dc into the ring (12 dc total).
- Close the Round: Join with a sl st to the top of the starting ch-3.
Round 2
- Ch 3: (counts as the first dc), dc in the same st.
- Increase Round: 2 dc in each dc around (24 dc total).
- Close the Round: Join with a sl st to the top of the starting ch-3.
Round 3
- Ch 3: (counts as the first dc), dc in the next dc, 2 dc in the next dc repeat around (36 dc total).
- Close the Round: Join with a sl st to the top of the starting ch-3.
Creating the Rings
To achieve the interconnected rings, you will work with both light and dark colors, alternating to create the ring pattern.
- Change Color: Join a new color with a sl st in any dc.
- Ch 3: (counts as the first dc), dc in the same st, dc in the next 2 dc, 2 dc in the next dc repeat around (48 dc total).
- Close the Round: Join with a sl st to the top of the starting ch-3.
Connecting Rings
For a traditional wedding ring pattern, you will create multiple rings and join them as you go.
- Create Additional Rings: Repeat the above steps to create more rings.
- Join Rings: When joining rings, align them and use sc to connect the outer edges, creating the interlocking pattern.
Assembling the Quilt
- Lay Out the Rings: Arrange your rings in the desired pattern. Typically, rings are laid out in a grid, with each ring interlocking with adjacent rings.
- Join the Rings: Using sc or a whip stitch, join the rings together at their edges. Ensure the rings are aligned properly to maintain the pattern.
Adding the Border
A border gives the quilt a finished look and helps secure the edges.
- Border Round 1: With your chosen border color, join yarn with a sl st in any st along the edge. Ch 1, sc around the entire quilt, making 3 sc in each corner.
- Border Round 2: Ch 3, dc around the quilt, making 3 dc in each corner.
- Additional Rounds: Repeat as desired for a thicker border.
Finishing
- Fasten Off: Once your border is complete, cut the yarn, leaving a 6-inch tail. Pull the tail through the loop on your hook and tighten.
- Weave in Ends: Use the yarn needle to weave in any loose ends, securing your work.
Tips for Beginners
- Practice Makes Perfect: If you’re new to crocheting, practice the basic stitches (ch, sc, dc) before starting the quilt.
- Use Stitch Markers: They can help you keep track of rounds and sections, especially when joining rings.
- Choose Contrasting Colors: Using contrasting colors for the rings can highlight the pattern and make it easier to see your progress.
- Stay Consistent with Tension: Keeping your tension consistent will ensure your rings are uniform in size and shape.
Congratulations! You’ve created a beautiful Wedding Ring Crochet Quilt. This intricate and meaningful project is sure to become a cherished heirloom. Enjoy the process and the result of your hard work. Happy crocheting!


