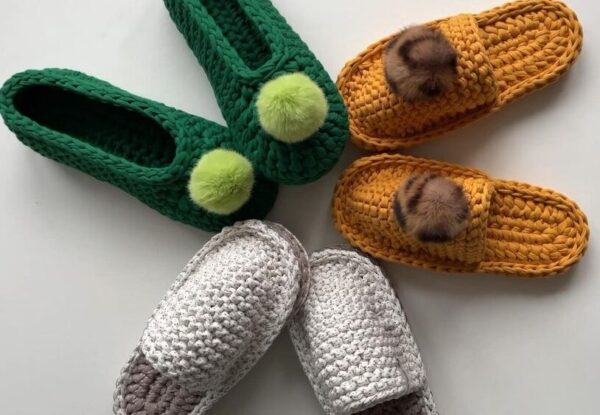
Crochet slippers are cozy and charming pieces, perfect for keeping your feet warm on colder days.
Plus, they are rewarding projects for anyone who loves crafts and wants to create their own accessories.
In this article, we will guide you through a simple and easy pattern to crochet slippers.

Even if you are a beginner, with patience and dedication, you can create a charming pair of slippers!
Necessary materials
Before starting, make sure you have the right materials. You will need:
- Crochet hook (recommended size for the chosen yarn thickness).
- Wool or cotton thread in the desired color (or colors if you want to make multicolored slippers).
- Scissors.
- Tapestry needle for sewing loose ends.
Pattern for Crochet Slippers
Step 1: Measure the foot
To start, measure the foot you will be wearing the slipper on. Record the length measurement from the heel to the tip of the longest toe and the width of the foot. This will help determine the number of stitches and rows needed for the correct fit.
Step 2: Make the Sole
- Make a magic ring with 6 single crochets (sc).
- On the second row, make 2 single crochets in each stitch on the previous row (total of 12 sc).
- Gradually continue increasing, increasing 6 stitches on each row, until the sole reaches the desired foot width. Remember to try the garment on occasionally to ensure the proper fit.
Step 3: Work the Sides
- Work in circular rows without increases, keeping the same number of stitches as in the previous row.
- Continue working in circular rows until you reach the desired slipper height. Remember to try the garment on your foot regularly to check that the height is correct.
Step 4: Do the Heel Part
- To make the heel part, you can choose to work in back and forth rows or in circular rows until you reach the proper size for the heel opening.
- Then work a few rows with single crochets or another stitch of your choice to create a tight finish.
Step 5: Finishing
Cut the yarn and pull it through the last stitch to finish the top of the heel.
Use a tapestry needle to hide any loose ends inside the slipper.
Step 6: Details
Now is the time to unleash your creativity! You can add details such as embroidery, bows, pompoms or buttons to personalize your slippers and make them even more special.
Conclusion
With this simple pattern, you can create your own personalized and unique crochet slippers. Remember to practice and don’t worry if your pieces don’t come out perfect at first.
Over time, your skill will improve and you will create even more amazing slippers. Enjoy the creative journey and most of all, have fun crocheting your slippers!


