


Quilting is a cherished tradition that allows crafters to transform scraps of fabric into stunning works of art.
Among the plethora of quilt patterns available, the Scrappy Trip Tips quilt pattern stands out for its simplicity and charm.
In this comprehensive guide, we’ll delve into the world of quilting with the Scrappy Trip Tips pattern, offering step-by-step instructions and tips for beginners to create their own beautiful quilts.
Introduction to the Scrappy Trip Tips Quilt Pattern
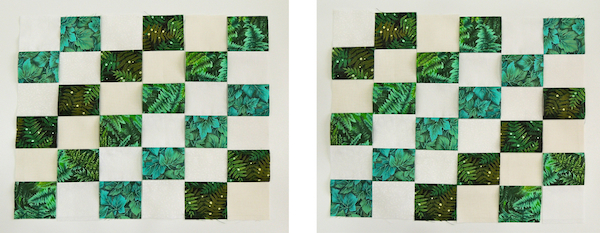
The Scrappy Trip Tips quilt pattern is a modern take on the traditional Trip Around the World design.
It features fabric strips sewn together in a diagonal pattern, creating a dynamic and visually captivating effect.
What makes this pattern particularly appealing is its use of scrap fabric, allowing quilters to make use of leftover materials and unleash their creativity.
Materials You’ll Need:
Before diving into your quilting project, gather the following materials:
- Scraps of fabric in various colors and patterns
- Background fabric
- Quilting ruler
- Rotary cutter or fabric scissors
- Sewing machine
- Thread
- Iron and ironing board
- Quilt batting
- Quilt backing fabric
- Quilting pins or clips
Step-by-Step Guide to Creating Your Scrappy Trip Tips Quilt:
Step 1: Sort Your Scraps
Start by sorting your scrap fabric into piles based on color or pattern. This will make it easier to select fabrics for each strip and ensure a harmonious color palette.
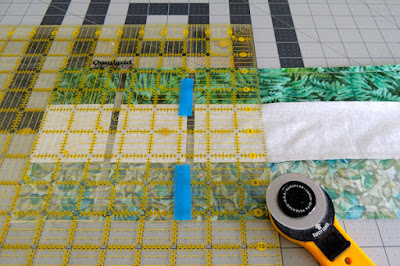
Step 2: Cut Your Strips
Using your quilting ruler and rotary cutter or fabric scissors, cut your scrap fabric into strips of equal width. Aim for strips that are around 2.5 inches wide, but feel free to adjust the width to suit your preferences.
Step 3: Arrange Your Strips
Once you’ve cut your strips, arrange them in groups of three to create strip sets. Mix and match colors and patterns to create visually interesting combinations.
Step 4: Sew Your Strip Sets
Take two strips from each strip set and sew them together along the long edges, creating pairs of strips. Then, sew the remaining strip to the pair to form a strip set. Press the seams open or to one side for a neat finish.
Step 5: Trim and Arrange Your Blocks
Once your strip sets are sewn together, trim them to create blocks of equal size. Arrange the blocks in a pleasing pattern, rotating them as needed to create movement and variation.
Step 6: Sew Your Blocks Together
Sew your blocks together to form rows, ensuring that the seams line up neatly. Then, sew the rows together to complete your quilt top.
Step 7: Layer and Quilt Your Quilt
Layer your quilt top with batting and backing fabric, then baste the layers together using quilting pins or clips. Quilt as desired, either by hand or using a sewing machine, to secure the layers together.
Step 8: Bind Your Quilt
Once you’ve finished quilting, trim any excess fabric from the edges of your quilt and bind the edges to finish them neatly.
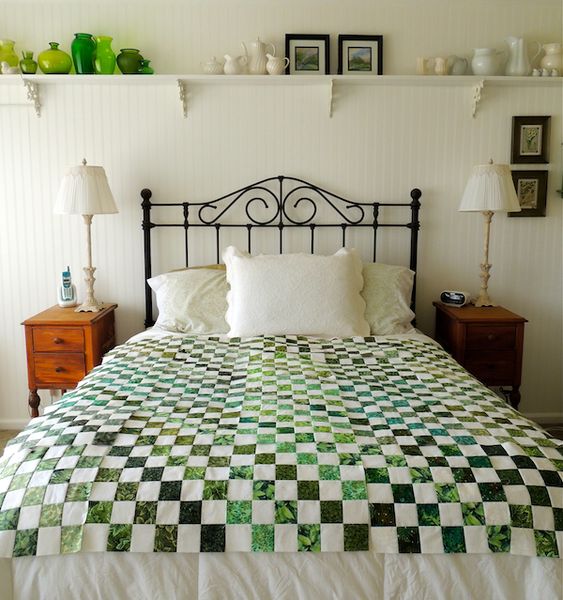
Conclusion
Creating a quilt with the Scrappy Trip Tips pattern is a fun and rewarding experience, perfect for quilters of all skill levels.
With its simple construction and endless possibilities for color and pattern combinations, this pattern offers a great way for beginners to dip their toes into the world of quilting.
So gather your scraps, follow these steps, and let your creativity shine as you embark on your quilting journey with the Scrappy Trip Tips pattern. Happy quilting!


