


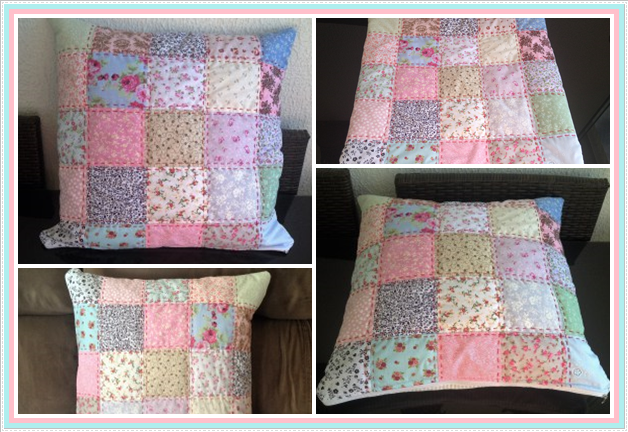
Creating a patchwork pillow is a delightful way to use up fabric scraps and add a personalized touch to your home decor.
This project is perfect for beginners, offering a straightforward introduction to basic sewing and quilting techniques.
Follow this step-by-step guide to craft your very own patchwork pillow.
Materials Needed
- Fabric Scraps: Assorted cotton fabrics in various colors and patterns
- Pillow Form: One 16×16 inch pillow insert
- Thread: Matching or contrasting colors
- Sewing Machine: Basic sewing machine
- Cutting Tools: Rotary cutter, cutting mat, and fabric scissors
- Measuring Tools: Quilting ruler and measuring tape
- Pins or Clips: To hold fabric pieces together
- Iron and Ironing Board: For pressing fabric and seams
- Optional: Embellishments like buttons or lace
Step-by-Step Instructions
Step 1: Preparing the Fabric
-
Choose Your Fabrics:
- Select a variety of cotton fabric scraps in coordinating colors and patterns. Aim for a balance of light, medium, and dark shades to create visual interest.
-
Wash and Iron:
- Pre-wash, dry, and iron your fabric scraps to prevent shrinking and to remove any wrinkles.
-
Cut the Fabric Pieces:
- Using a rotary cutter and quilting ruler, cut the fabric scraps into 4.5×4.5 inch squares. You will need a total of 36 squares to create a 16×16 inch pillow top (six squares by six squares).
Step 2: Arranging and Assembling the Patchwork
-
Arrange the Squares:
- Lay out the fabric squares in a 6×6 grid. Play around with the arrangement until you are happy with the layout. Ensure the colors and patterns are evenly distributed.
-
Sew the Squares Together:
- Start by sewing the squares together in rows. Place two squares right sides together and sew along one edge using a 1/4-inch seam allowance. Continue adding squares to form a row of six.
- Repeat this process to create all six rows.
-
Press the Seams:
- Press the seams of each row to one side, alternating the direction of the seams in each row. This will help the seams nest together when you sew the rows.
-
Join the Rows:
- Pin and sew the rows together, matching the seams carefully. Use a 1/4-inch seam allowance and press the seams open or to one side after sewing each row.
Step 3: Completing the Pillow Top
-
Check the Size:
- Measure the completed patchwork top. It should be approximately 16.5×16.5 inches, including seam allowances.
-
Trim if Necessary:
- If the patchwork top is slightly larger, trim the edges to ensure it is the correct size.
Step 4: Preparing the Backing
-
Cut the Backing Fabric:
- Cut two pieces of fabric for the pillow backing, each measuring 16.5×11 inches. These pieces will create an envelope closure, making it easy to remove the pillow insert for washing.
-
Hem the Edges:
- On one long edge of each backing piece, fold the fabric over 1/2 inch and press. Fold over another 1/2 inch and press again. Sew along the folded edge to create a clean hem.
Step 5: Assembling the Pillow
-
Layer the Pieces:
- Place the patchwork top right side up on a flat surface. Lay the backing pieces right side down on top of the patchwork top, aligning the raw edges. The hemmed edges should overlap in the center.
-
Pin and Sew:
- Pin around the edges to secure the layers. Sew around the entire perimeter using a 1/4-inch seam allowance. Backstitch at the beginning and end to secure the stitches.
-
Trim the Corners:
- Trim the corners diagonally to reduce bulk and turn the pillow cover right side out. Use a point turner or the end of a pencil to push out the corners.
-
Press and Finish:
- Press the pillow cover flat, paying attention to the seams. Insert the pillow form through the envelope closure.
Optional: Adding Embellishments
- Buttons or Lace: Add decorative buttons or lace to the front of the pillow for extra flair.
- Embroidery: Personalize your pillow with embroidered initials or designs.
Tips for Success
- Consistent Seams: Maintaining a consistent 1/4-inch seam allowance ensures that your patchwork pieces fit together neatly.
- Ironing: Pressing seams as you go helps keep your fabric flat and makes sewing easier.
- Fabric Choice: Mixing solids and patterns can create a dynamic and visually appealing design.
- Practice: If you’re new to sewing, practice sewing straight lines on scrap fabric before starting your patchwork pillow.
Conclusion
Creating a patchwork pillow is a fun and rewarding project that allows you to practice basic sewing and quilting techniques.
This guide provides a clear, step-by-step approach to making a beautiful and personalized pillow.
Whether you’re making it for yourself or as a gift, the finished product is sure to add a touch of handmade charm to any space. Enjoy the process and happy sewing!


