Creating a patchwork teddy bear is a delightful project that combines the charm of quilting with the joy of toy-making.
This guide is perfect for beginners, offering clear, step-by-step instructions to help you craft a lovable patchwork bear. Let’s get started!
Materials Needed
- Fabric Scraps: Various colors and patterns of cotton fabric.
- Stuffing: Polyester fiberfill.
- Thread: Matching or contrasting colors.
- Needles: Hand sewing and embroidery needles.
- Scissors: Fabric and embroidery scissors.
- Pins: For holding pieces together.
- Sewing Machine: Optional, for faster assembly.
- Embroidery Floss: For eyes and nose details.
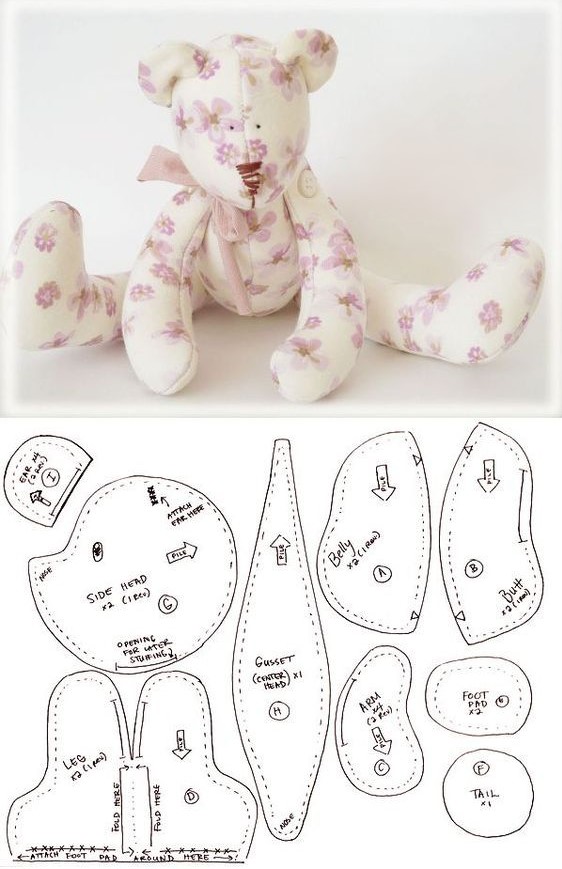
- Pattern: Download or draw a simple teddy bear pattern.
Step-by-Step Instructions
Step 1: Preparing the Pattern
- Download or Draw a Pattern:
- Find a simple teddy bear pattern online or draw your own. The pattern should include the body, arms, legs, and ears.
- Print and Cut Out the Pattern:
- Print the pattern on sturdy paper and cut out each piece carefully.
Step 2: Cutting the Fabric
-
Select Your Fabrics:
- Choose a variety of cotton fabric scraps in different colors and patterns for a charming patchwork look.
-
Prepare the Fabric:
- Wash, dry, and iron the fabric scraps to pre-shrink them and remove any wrinkles.
-
Cut the Fabric Pieces:
- Using the pattern pieces, cut out the required number of fabric pieces for each part of the bear. For example, cut two body pieces, two arms, two legs, and two ears from different fabrics.
Step 3: Assembling the Patchwork
-
Arrange the Fabric Pieces:
- Lay out the fabric pieces in the desired patchwork pattern. Mix and match the fabrics to create an appealing design.
-
Sew the Patchwork Pieces Together:
- Sew the fabric pieces together using a 1/4-inch seam allowance. You can do this by hand or with a sewing machine. Press the seams open with an iron to keep the fabric flat.
Step 4: Constructing the Teddy Bear
-
Sew the Body:
- Place the two body pieces right sides together and pin them in place. Sew around the edges, leaving a small opening for turning and stuffing.
-
Sew the Arms, Legs, and Ears:
- Repeat the process for the arms, legs, and ears. Sew the pieces right sides together, leaving openings for turning and stuffing.
-
Turn and Stuff the Pieces:
- Turn all the pieces right side out. Use a chopstick or the end of a pencil to help turn small parts. Stuff each piece with polyester fiberfill until they are firm but still soft.
-
Attach the Ears:
- Pin the ears in place on the bear’s head and sew them securely.
-
Attach the Arms and Legs:
- Pin the arms and legs to the body in the desired positions and sew them securely. Make sure the limbs are evenly placed.
Step 5: Adding the Finishing Touches
-
Close the Openings:
- Use a ladder stitch to close the openings on the body, arms, legs, and ears after stuffing.
-
Embroider the Face:
- Use embroidery floss to sew the eyes and nose. You can also add a mouth if desired. Black or dark brown floss works well for these details. Use small, tight stitches to ensure the features are secure.
-
Add Decorative Details:
- You can add a bow, a small heart, or other decorative touches to personalize your teddy bear. Use small fabric scraps, ribbons, or buttons to embellish your creation.
Step 6: Enjoy Your Patchwork Teddy Bear
Congratulations! You’ve made an adorable patchwork teddy bear. This handmade toy is not only a wonderful gift but also a cherished keepsake that can be passed down through generations.
Tips for Success
- Choose Complementary Fabrics: When selecting fabric scraps, choose colors and patterns that complement each other for a cohesive look.
- Precision in Cutting and Sewing: Accurate cutting and precise sewing are key to creating a professional-looking teddy bear.
- Take Your Time: Don’t rush the process. Enjoy each step and take your time to ensure your bear turns out beautifully.
- Experiment with Sizes: Once you’ve mastered the basic pattern, try making bears in different sizes for a delightful collection.
Conclusion
Making a patchwork teddy bear is a rewarding project that combines creativity and craftsmanship.
This guide provides a straightforward approach for beginners, ensuring that even those new to sewing can create a beautiful and cherished toy.
Whether you’re making it as a gift or for yourself, a handmade teddy bear is a timeless treasure that brings joy to both the maker and the recipient. Happy sewing!


