


American quilting beautifully combines tradition, creativity, and comfort — and when it comes to Christmas décor, few themes are as charming as the poinsettia and the cardinal, both symbols of winter and holiday warmth.
In this article, you’ll learn how to create a quilted table runner featuring both motifs, perfect for decorating your home or gifting handmade joy.
This project is ideal for quilters with basic sewing knowledge, but it can also be adapted for adventurous beginners.
Materials Needed
-
100% cotton fabric:
-
Red (poinsettia petals)
-
Green (leaves)
-
Cream or white (background)
-
Christmas prints (optional)
-
Black, brown, and dark red (for the cardinal)
-
-
Backing fabric (cotton or muslin)
-
Batting (R1 or R2)
-
Polyester thread (red, green, black, and neutral)
-
Sewing machine
-
Iron
-
Rotary cutter, cutting mat, and quilting ruler
-
Fabric marker or erasable pen
-
Pins or clips
-
Quilting needle
Finished Size
Suggested finished size:
16″ × 47″ (40 cm × 120 cm)
Feel free to adjust to your table.
Project Structure
The table runner consists of:
-
Central poinsettia blocks
-
Cardinal appliqué block
-
Border strips
-
Quilting layer
-
Bias binding
PART 1 — Poinsettia Quilt Block
1. Cutting the Pieces
-
6 large red petals (elongated petal shape)
-
6 smaller red petals (inner layer)
-
3 green leaves
-
1 yellow circle for the center (1–1.25″ / 3 cm)
-
Background square: 12″ × 12″ (30 × 30 cm)
2. Assembling the Poinsettia
-
Arrange the large petals in a circle at the center of the block.
-
Pin in place.
-
Layer the smaller petals between the larger ones for added volume.
-
Place the yellow circle in the center.
-
Stitch using a narrow zigzag or blanket stitch (appliqué technique).
3. Adding the Leaves
-
Tuck the green leaves under the outer petals.
-
Stitch around each leaf using blanket stitch for clean edges.
The poinsettia should fill most of the block, creating a bold, festive centerpiece.
PART 2 — Cardinal Appliqué Block
1. Template or Sketch
Create or print a simple cardinal template including:
-
Body
-
Wing
-
Beak
-
Black mask
-
Branch
2. Cutting the Fabric Pieces
-
Bright red for the body
-
Black for the mask
-
Yellow or gold for the beak
-
Brown for the branch
3. Appliqué Assembly
-
Position the branch diagonally on the background square (12″ × 12″).
-
Place the cardinal sitting on the branch.
-
Fuse pieces with iron-on adhesive if desired.
-
Sew with a small straight stitch or blanket stitch.
4. Adding Details
-
Use black thread to stitch the eye and outline details.
-
Add decorative quilting on the wing for dimension.
PART 3 — Block Layout
Suggested block layout:

-
Trim each block to 11″ × 11″ (28 × 28 cm) after appliqué.
-
Join the three blocks side-by-side, right sides together.
-
Press all seams flat.
Your center panel will measure approximately:
11″ × 33″ (28 × 84 cm).
PART 4 — Adding the Borders
Cutting the Borders
-
2 long strips: 4″ × 33″ (10 × 84 cm)
-
2 short strips: 4″ × 19″ (10 × 48 cm)
Assembling the Borders
-
Sew the short strips to the top and bottom of the center panel.
-
Sew the long strips to the left and right sides.
-
Press well.
Your table runner top should now measure about
16″ × 47″ (40 × 120 cm).
PART 5 — Quilting
1. Making the Quilt “Sandwich”
Layer in this order:
-
Backing (wrong side up)
-
Batting
-
Quilted top (right side up)
Pin or baste thoroughly.
2. Quilting Suggestions
-
Free-motion quilting on poinsettia petals (soft curves)
-
Straight-line quilting on the background
-
Gentle outline quilting around the cardinal to make it pop
-
Wavy or decorative quilting on the borders
The quilting adds texture and brings the artwork to life.
PART 6 — Binding the Table Runner
-
Cut 2.5″ (6 cm) strips to make your bias binding.
-
Sew the binding all around the table runner.
-
Fold it over to the back and hand-stitch with an invisible stitch.
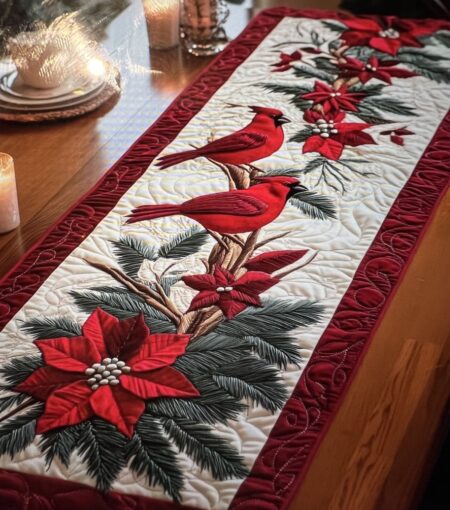
Final Result
Your quilted poinsettia and cardinal table runner is ready!
It is:
-
Elegant
-
Festive
-
Perfect for holiday gatherings
-
A beautiful gift for someone special
-
A stunning handmade décor piece


