


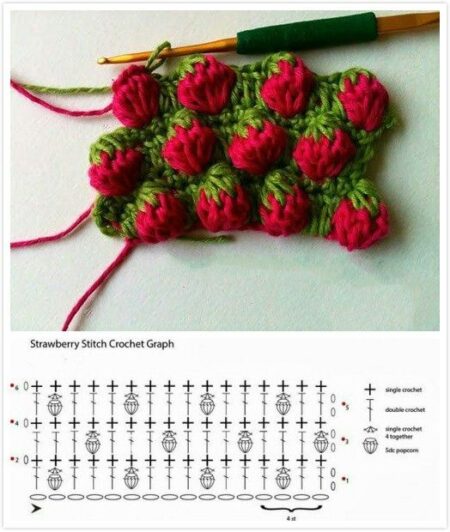
The Crochet Strawberry Stitch is a charming textured stitch that creates small raised clusters resembling tiny strawberries.
This stitch adds depth, softness, and a playful handmade look to any project. It’s especially popular for blankets, bags, hats, cushions, and baby items.
In this article, you’ll learn how to crochet the Strawberry Stitch from the beginning, using clear instructions, especially for beginners.
What Is the Crochet Strawberry Stitch?
The Strawberry Stitch is a textured crochet stitch made by grouping multiple unfinished double crochets and closing them together in the same stitch.
This technique creates a small 3D “bump,” giving the fabric a rich and decorative surface.
Although it looks advanced, the stitch follows a simple repeat and is easy to memorize, making it perfect for crocheters who want to build confidence while learning textured patterns.
Materials You Will Need
- Medium or lightweight yarn (cotton or acrylic works well)
- Crochet hook suitable for your yarn (usually 3.5 mm–4.5 mm)
- Scissors
- Yarn needle
- Stitch marker (optional)
Abbreviations Used
- ch – chain
- sc – single crochet
- dc – double crochet
- ss – slip stitch
- st – stitch
How to Crochet the Strawberry Stitch – Step by Step
1. Foundation Row
- Chain a number of stitches that is a multiple of 4 + 2.
- Work 1 row of single crochet across the foundation chain.
Transition: Once the base is complete, you are ready to start forming the textured strawberry clusters.
2. Strawberry Stitch Row
- Chain 3 (counts as the first double crochet).
- Skip 1 stitch.
- In the next stitch, make the Strawberry Stitch cluster:
- Yarn over, insert hook, pull up a loop (repeat this step 3 times in the same stitch).
- You will have several loops on your hook.
- Yarn over and pull through all loops at once.
- Chain 1 to secure the cluster.
- Skip the next 2 stitches.
Repeat this sequence across the row.
Transition: As you continue, the strawberry-like texture will start to appear clearly across your fabric.
3. Separation Row
- Work 1 single crochet in each stitch across the entire row.
This row gives space to the clusters and keeps the texture neat and well-defined.
Transition: Alternating these two rows is the key to maintaining an even and beautiful pattern.
4. Pattern Repeat
Continue repeating:
- 1 Strawberry Stitch row
- 1 Single Crochet row
Repeat until your project reaches the desired height or length.
Beginner Tips
- Use light-colored yarn to clearly see the stitches.
- Keep your tension relaxed so the clusters don’t become stiff.
- Practice the stitch on a small swatch before starting a large project.
- Pair the Strawberry Stitch with simple stitches to highlight the texture.
Best Uses for the Strawberry Stitch
This versatile stitch works beautifully for:
- Blankets and throws
- Crochet bags
- Pillow covers
- Hats and scarves
- Baby blankets and decorative items
Conclusion
The Crochet Strawberry Stitch is a perfect choice for crocheters who want to explore texture without complicated techniques.
Its simple repetition and charming 3D effect make it both relaxing to work and visually stunning in finished pieces.
By following this beginner-friendly step-by-step guide, you’ll be able to confidently use the Strawberry Stitch in a wide variety of crochet projects.


