


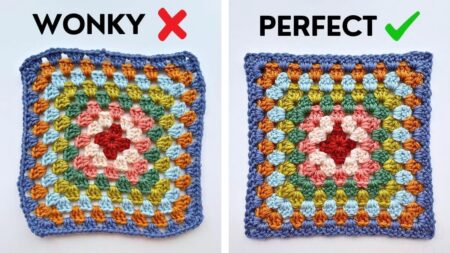
If you’ve ever finished a crochet granny square only to notice that it looks slightly crooked, twisted, or uneven, you are definitely not alone. In fact, this is one of the most common frustrations beginners face when learning crochet.
The good news, however, is that there’s a very simple solution.
Once I learned this easy trick, my granny squares immediately started looking flatter, straighter, and much more professional. Honestly, I wish I had taken this advice more seriously when I first heard it.
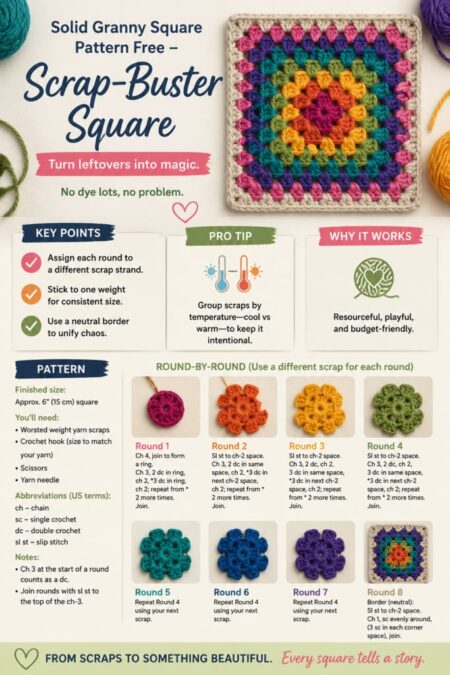
In this guide, you’ll discover:
- Why granny squares twist
- The easiest way to prevent crooked edges
- Beginner-friendly tips for perfect squares
- Simple crochet hacks that make a huge difference
So, let’s fix those twisted granny squares once and for all.
✨ Why Do Granny Squares Twist?
At first, many crocheters think they are “doing it wrong.” However, twisting usually happens because of small tension issues and repetitive turning in the same direction.
Here are the most common causes:
- Uneven tension
- Tight corner stitches
- Not turning rounds correctly
- Skipping stitches accidentally
- Pulling yarn too tightly
- Using the wrong hook size
Fortunately, most of these problems are easy to fix.
🌟 The Simple Trick That Changes Everything
The easiest way to stop granny squares from twisting is this:
👉 TURN YOUR WORK AFTER EACH ROUND
Yes, that’s it.
Instead of continuing every round from the same side, simply turn your square over before starting the next round.
This balances the natural slant of crochet stitches.
As a result:
- Your corners become straighter
- The square stays flatter
- The edges look more even
- The fabric twists less
It sounds almost too simple, but it truly works.
🧵 How to Turn Granny Squares Properly
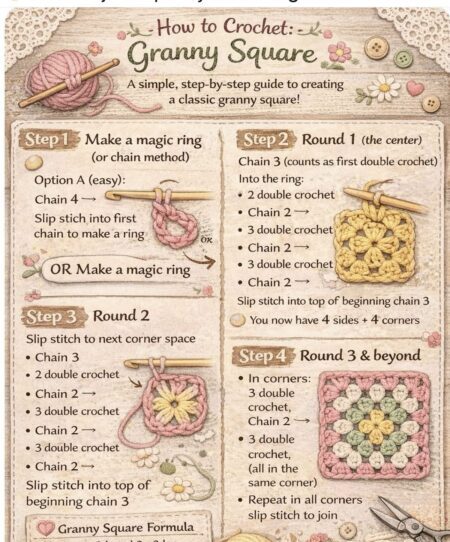
After completing a round:
- Slip stitch to join
- Chain your starting stitches
- Turn the square over
- Begin the next round in the opposite direction
That tiny change creates a much more symmetrical square.
☁️ Why This Crochet Trick Works
Crochet stitches naturally lean slightly to one side. Therefore, when you crochet continuously in the same direction, the fabric slowly starts twisting.
By turning your work:
- One round leans slightly left
- The next round balances it toward the right
Eventually, everything evens out beautifully.
This is especially helpful for:
- Granny square blankets
- Crochet cardigans
- Pillow covers
- Bags
- Large afghans
🪄 Another Magic Tip: Relax Your Corners
One of the biggest reasons squares warp is overly tight corners.
Instead of pulling corner stitches tightly:
- Relax your tension slightly
- Add an extra chain if needed
Your square should lie naturally flat without forcing it.
📏 Use Stitch Markers (Seriously!)
Many beginners underestimate stitch markers. However, they can completely transform your crochet experience.
Place stitch markers:
- In each corner
- At the beginning of rounds
- In difficult stitch sections
As a result, you’ll lose your place less often and your squares will stay more consistent.
🧶 Blocking Is a Game Changer
Even experienced crocheters block their granny squares.
Blocking helps:
- Straighten edges
- Shape corners
- Smooth uneven stitches
- Make joining easier
Simple Blocking Method
- Lightly spray your square with water
- Pin it to a flat surface
- Shape the corners evenly
- Let it dry completely
The difference can be incredible.
💡 Check Your Hook Size
Sometimes the issue is not your technique—it’s your hook.
If your squares curl:
👉 Try a slightly larger hook.
If your stitches feel too loose:
👉 Try going down half a size.
Small adjustments can dramatically improve the shape.
🌈 Choose the Right Yarn
Some yarns naturally behave better for granny squares.
Beginner-Friendly Yarns
- Cotton blends
- Acrylic yarn
- Medium weight yarn (#4)
Try to avoid overly slippery yarn when learning.
Textured or fluffy yarn can make mistakes harder to see.
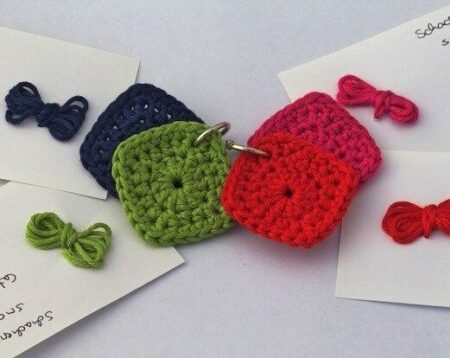
🧸 Best Granny Square Projects for Beginners
Once your squares become flatter and more even, you can create so many beautiful projects.
Easy Ideas:
- Granny square blankets
- Tote bags
- Baby blankets
- Pillow covers
- Table runners
- Cardigans
Granny squares are timeless because they’re versatile, relaxing, and portable.
✨ Extra Crochet Hacks That Make Life Easier
Here are a few more beginner tricks that can instantly improve your crochet:
🪡 Weave Ends Immediately
Don’t wait until the end of the project.
🧵 Count Stitches Often
Especially in early rounds.
☕ Take Breaks
Tired hands create tighter tension.
📦 Store Squares Flat
Stacking them neatly helps maintain shape.
🌸 Practice Small Swatches
Testing stitches first saves frustration later.
💖 Final Thoughts
Crochet is a skill that becomes easier with small discoveries. Sometimes, one tiny trick can completely change the way your projects look and feel.
Turning your granny square after each round may seem simple, but it truly makes a huge difference. Combined with relaxed tension, proper blocking, and a little patience, your squares will start looking cleaner, flatter, and more professional.
Most importantly, don’t be discouraged by imperfect squares. Every crocheter starts there.
With practice, your hands learn the rhythm—and suddenly, those once-twisted squares become beautiful little works of art.
Happy crocheting!