


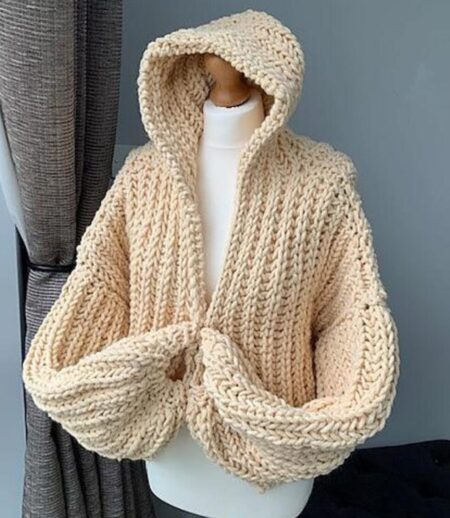
Oversized crochet sweaters are a major trend in modern handmade fashion. The chunky hooded crochet sweater, like the one shown in the images, combines comfort, texture, and contemporary style.
Made with extra-thick yarn and simple stitches, this piece is perfect for beginners who want to create a bold, cozy garment for fall and winter.
In this tutorial, you’ll learn how to crochet an oversized sweater with a hood, using easy techniques, minimal shaping, and a stylish textured stitch — all explained step by step.
✨ Why This Crochet Sweater Is So Popular
This hooded crochet sweater stands out because it:
-
Features a modern oversized fit
-
Uses chunky yarn, making it faster to complete
-
Has a hood for extra warmth and style
-
Works well for casual and urban outfits
-
Is ideal for handmade winter fashion
Because of its versatility, this sweater is also a great option for selling handmade crochet pieces in the U.S. market.
🧵 Materials Needed
-
Super bulky or jumbo yarn (wool or acrylic blend)
-
Approx. 28–35 oz (800 g – 1 kg)
-
-
Crochet hook 10 mm – 12 mm (US N/P)
-
Scissors
-
Yarn needle
📏 Finished Size
-
Oversized fit (fits Women’s M–XL comfortably)
-
Approximate length: 24–26 inches (60–65 cm)
-
Wide sleeves with relaxed drape
💡 Tip: The loose fit is intentional and part of the design.
🧶 Stitch Pattern Used
-
Double Crochet (dc)
-
Front Post Double Crochet (FPdc)
Alternating these stitches creates the thick vertical ribbed texture seen in the sweater.
🪡 Step-by-Step Crochet Instructions
🧥 1. Back Panel
-
Chain 36 stitches (adjust for desired width).
-
Double crochet into the 3rd chain from the hook and across.
-
Row 2: Alternate
-
1 double crochet
-
1 front post double crochet
-
-
Repeat this pattern until the panel measures 16–18 inches.
Transition: Once the back panel is complete, the sweater already shows its signature chunky texture.
👚 2. Front Panel
-
Crochet the front panel exactly the same as the back panel.
-
Work until it reaches the same length.
⚠️ This design has no front opening, giving it a clean, minimalist look.
🧶 3. Join Front and Back
-
Place the panels together, right sides facing.
-
Seam the shoulders using slip stitches.
-
Leave a 7–8 inch neck opening in the center.
🪡 4. Oversized Sleeves
-
Attach yarn at the armhole.
-
Work in rounds, alternating:
-
double crochet
-
front post double crochet
-
-
Crochet until the sleeve measures 12–14 inches.
-
Do not decrease — the fullness is part of the design.
Transition: The roomy sleeves give the sweater its relaxed, cozy silhouette.
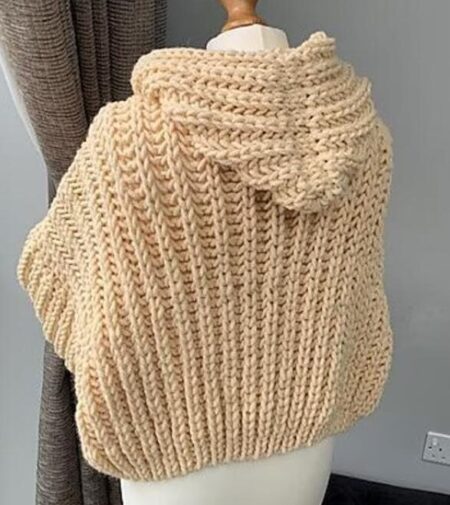
🧢 5. Crochet Hood
-
Attach yarn around the neckline.
-
Work 24 double crochets evenly spaced.
-
Crochet back and forth in rows using the same textured stitch.
-
Continue until the hood measures 12 inches in height.
-
Fold in half and seam the top closed.
✂️ 6. Finishing Touches
-
Weave in all loose ends securely
-
Optional: add a round of single crochet around edges
-
Do not block to preserve the chunky structure
✨ Beginner Tips
-
Keep stitches loose to maintain softness
-
Test your stitch pattern before starting
-
Use stitch markers to keep rows aligned
-
Neutral colors like brown, camel, cream, or gray work best
👗 How to Style This Sweater
-
Pair with skinny jeans and boots
-
Layer over fitted dresses
-
Create a monochrome look
-
Perfect for fall walks and winter outings
🧶 Final Thoughts
This oversized hooded crochet sweater proves that crochet can be both stylish and beginner-friendly.
With chunky yarn, simple stitches, and a relaxed fit, this project is ideal for anyone looking to create a statement piece that’s cozy, modern, and handmade.
Whether you’re crocheting for yourself, gifting, or selling, this sweater is a timeless addition to any cold-weather wardrobe.


