


Crocheting amigurumi is one of the most enjoyable ways to bring yarn to life, and a crochet fish amigurumi is a perfect project for beginners.
Simple in shape, quick to finish, and full of charm, this pattern is ideal for learning basic amigurumi techniques while creating a playful handmade piece.
In this tutorial, you’ll learn how to crochet an easy fish amigurumi, step by step, using basic stitches and simple shaping.
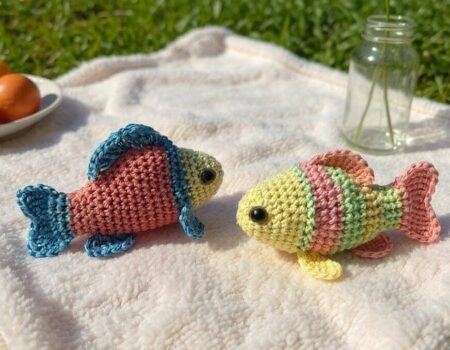
Whether you want to make toys, keychains, nursery décor, or handmade gifts, this pattern is a great starting point.
🧶 Materials Needed
To begin, gather the following supplies:
-
Medium or lightweight yarn (cotton or acrylic works well)
-
Crochet hook suitable for your yarn (2.5 mm to 3.5 mm recommended)
-
Fiberfill stuffing
-
Tapestry needle
-
Scissors
-
Safety eyes or embroidery thread (optional)
💡 Tip: Bright or pastel colors give the fish a cheerful and playful look.
🧵 Crochet Abbreviations (US Terms)
-
ch – chain
-
sc – single crochet
-
inc – increase (2 sc in the same stitch)
-
dec – decrease (single crochet 2 stitches together)
-
sl st – slip stitch
-
st – stitch
🐟 Step-by-Step Easy Fish Amigurumi Pattern
1️⃣ Body (Worked in Continuous Rounds)
Start with a magic ring.
-
Round 1: 6 sc into the magic ring (6)
-
Round 2: inc in each st around (12)
-
Round 3: (sc, inc) repeat around (18)
-
Round 4: sc in each st around (18)
At this point, the body begins to take shape. Keep your stitches tight and even.
2️⃣ Shaping the Fish
-
Round 5: (sc 2, inc) repeat around (24)
-
Rounds 6–8: sc in each st around (24)
Now the fish looks fuller and more rounded. This is a great moment to insert safety eyes if you’re using them.
3️⃣ Decreasing the Body
-
Round 9: (sc 2, dec) repeat around (18)
-
Round 10: (sc, dec) repeat around (12)
Before closing, lightly stuff the fish with fiberfill to keep it soft but firm.
4️⃣ Tail Fin
Instead of closing the body completely, we’ll form a simple tail:
-
Round 11: flatten the opening and crochet 5 sc across both layers
-
ch 1, turn
-
sc in each stitch across
-
repeat for 2–3 rows
Fasten off and weave in ends.
✨ This flat section naturally creates a cute fish tail.
5️⃣ Fins (Optional)
For side fins:
-
Attach yarn to the side of the body
-
ch 3, sl st in the same stitch
-
Fasten off
Repeat on the other side.
Customization Ideas
Once the base fish is complete, you can personalize it easily:
-
Add embroidered stripes or dots
-
Use color changes for the tail or fins
-
Attach a keyring to turn it into a keychain
-
Make different sizes using thicker or thinner yarn
Beginner-Friendly Tips
-
Use stitch markers to track rounds
-
Keep tension consistent
-
Don’t overstuff — the shape should stay smooth
-
Practice with scrap yarn first
Final Thoughts
This easy fish amigurumi crochet pattern is perfect for beginners who want quick results without complicated shaping. With just a few basic stitches, you can create an adorable handmade fish that’s fun, versatile, and great for gifts or décor.
As your confidence grows, you can experiment with colors, textures, and sizes to make each fish unique 🐠💙


")