


Crochet blankets come in many beautiful styles; however, some patterns stand out because of their creativity and playful design. The Lego-inspired crochet blanket pattern is one of those unique creations that instantly catches attention.
At first glance, this blanket looks like it was made with real building blocks. In reality, it is created using simple crochet techniques combined with clever texture details.
Because of this, it becomes an excellent project for beginners who want something fun and visually impressive.
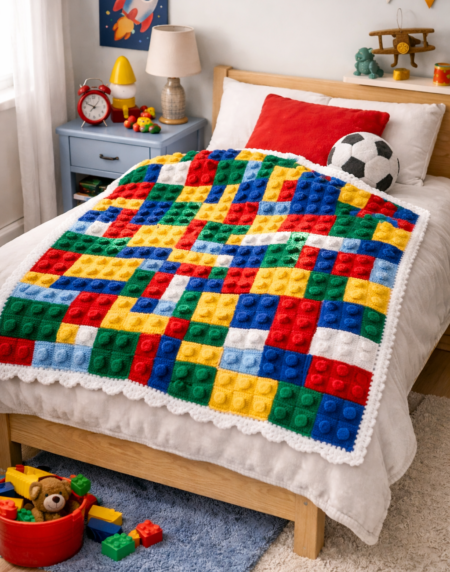
Moreover, the bold colors and raised “stud” stitches give the blanket a modern and joyful look. As a result, it is especially perfect for kids’ rooms, gifts, or playful home decor.
In this tutorial, you will learn how to crochet a Lego-style blanket step by step, using easy stitches and a repetitive pattern that is simple to follow.
Materials Needed
Before starting your crochet blanket, gather the following materials:
• Medium weight yarn (cotton or acrylic)
• Crochet hook size 4 mm – 5 mm
• Yarn needle
• Scissors
Suggested Colors
To recreate the Lego effect, use bright and contrasting colors such as:
• Red
• Blue
• Yellow
• Green
• White or light gray (for contrast)
Of course, you can customize the palette depending on your style or room decor.
Crochet Abbreviations (US Terms)
To make the pattern easier to follow, here are the abbreviations used:
CH – Chain
SC – Single Crochet
HDC – Half Double Crochet
DC – Double Crochet
BOB – Bobble Stitch
SL ST – Slip Stitch
ST – Stitch
The bobble stitch is the key technique that creates the raised “Lego dot” effect.
How to Crochet the Lego Block Pattern
This blanket is made by creating individual squares and then joining them together. Because of this, the project becomes portable and beginner friendly.
Step 1 – Creating the Base Square
First, choose your yarn color.
Chain 21 stitches.
Then, work 1 single crochet (SC) in each stitch across.
Turn your work and continue crocheting SC rows until you form a square.
Typically, this will take about 20 rows, depending on your tension.
At this stage, you will have a flat crochet square.
Step 2 – Adding the Lego Texture (Bobble Stitches)
Now comes the fun part.
To create the “Lego studs,” use bobble stitches.
On the next row:
• SC in the first few stitches
• Make a bobble stitch (BOB)
• Continue alternating between SC and BOB across the row
For a classic Lego look, place 4 to 6 bobbles evenly spaced.
On the following row, crochet only SC stitches to stabilize the texture.
As a result, the bobbles will pop out, creating a 3D effect.
Step 3 – Finishing the Square
Continue working a few more rows of SC to complete the square.
Once finished:
• Fasten off
• Weave in the ends
Repeat this process to create multiple squares in different colors.
Step 4 – Assembling the Blanket
After making enough squares, it is time to join them.
You can use:
• Slip stitch join (flat and neat)
• Whip stitch (easy for beginners)
Arrange the squares randomly or in a pattern to mimic real Lego blocks.
Because of the color variation, each blanket becomes unique.
Step 5 – Adding the Border
To finish the blanket, add a border.
Attach a neutral color, such as white.
Then:
• Work single crochet stitches around the entire blanket
• Add 3 SC in each corner
For extra detail, you can add a second round using a decorative stitch.
Tips for Beginners
Although this pattern is simple, a few tips can make a big difference.
First, keep your tension consistent so all squares are the same size.
In addition, try to align the bobble stitches evenly for a cleaner look.
Finally, blocking the squares before joining can improve the final result.
Why This Pattern Is Perfect for Beginners
There are several reasons why this crochet blanket is beginner friendly.
To begin with, the stitches are basic and repetitive. Therefore, the pattern is easy to memorize.
Furthermore, working in small squares makes the project less overwhelming.
Most importantly, the playful design keeps the process fun and motivating.
Because of these benefits, many beginners successfully complete this blanket as their first large project.
Creative Uses for This Blanket
This Lego-inspired crochet pattern is extremely versatile.
For example, you can use it to create:
• Kids’ bed blankets
• Playroom decor
• Baby blankets
• Gifts for birthdays
• Themed room accessories
Additionally, the colorful design makes it perfect for photography and Pinterest content.
Final Thoughts
Overall, the Lego crochet blanket pattern is a creative and enjoyable project that combines simplicity with a bold visual effect. While the stitches are easy to learn, the final result looks detailed and impressive.
Whether you are making it for a child, as a gift, or simply for fun, this blanket is guaranteed to stand out.
So, grab your yarn, choose your favorite colors, and start building your crochet masterpiece—one square at a time.


