


There is something incredibly special about a cozy baby cocoon wrap. Not only does it keep newborns warm and comfortable, but it also creates beautiful photo opportunities and makes a thoughtful handmade baby shower gift.
Even better, this crochet baby cocoon pattern is simple enough for confident beginners while still looking impressive when finished.
Throughout this tutorial, you’ll learn how to create a snug cocoon with a cute hood, textured stitches, and decorative details that resemble the cozy wraps featured in professional newborn photography.
Why You’ll Love This Crochet Baby Cocoon Pattern
First of all, baby cocoons work up surprisingly fast.
In addition, they require only basic crochet stitches and can easily be customized for boys, girls, or gender-neutral nurseries.
This pattern is perfect for:
- Newborn photography props
- Baby shower gifts
- Hospital coming-home outfits
- Nursery decor
- Handmade baby essentials
- Winter and fall baby accessories
Furthermore, the hood adds extra warmth while creating an adorable bear-ear or textured cable-inspired look.
Materials Needed
For best results, choose a soft baby yarn.
Supplies
- 4–5 skeins of soft baby yarn or chunky baby yarn
- Crochet hook size H (5 mm) or I (5.5 mm)
- Stitch markers
- Yarn needle
- Scissors
- 2 decorative wooden buttons (optional)
Skill Level
Easy to Intermediate Beginner
You should know:
- Chain (ch)
- Single Crochet (sc)
- Half Double Crochet (hdc)
- Double Crochet (dc)
- Slip Stitch (sl st)
Finished Size
Newborn Size:
- Length: approximately 20–22 inches
- Width: approximately 10–12 inches
However, you can easily adjust the size by adding more starting chains and additional rows.
Crochet Abbreviations
- ch = chain
- sc = single crochet
- hdc = half double crochet
- dc = double crochet
- sl st = slip stitch
- st = stitch
- rep = repeat
Step 1: Create the Cocoon Base
Start by making:
Ch 40
Row 1:
Work 1 hdc into the second chain from the hook and continue across.
Turn.
Row 2:
Ch 1 and work hdc in each stitch across.
Turn.
Continue repeating Row 2 until the rectangle measures approximately 20 inches long.
At this stage, you should have a soft rectangular panel.
Step 2: Form the Cocoon Pocket
Next, fold the rectangle in half lengthwise.
Using single crochet stitches, join both sides together.
Leave the top edge open.
As a result, you’ll create a warm sleeping-bag shape that gently cradles the baby.
Fasten off and weave in ends.
Step 3: Create the Hood
Now it’s time to add the hood.
Attach yarn at one upper corner.
Work evenly across the opening using hdc stitches.
Hood Row 1
Hdc evenly across.
Turn.
Hood Rows 2–15
Continue working hdc across each row.
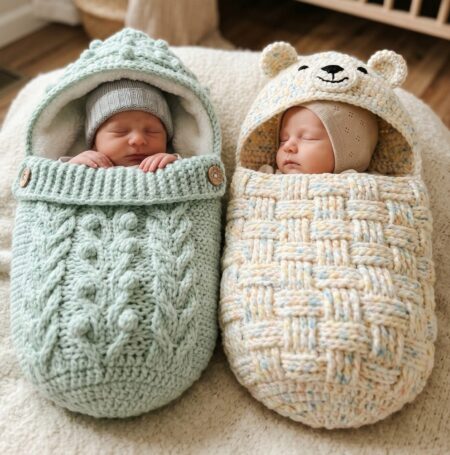
As the hood grows, it will naturally begin to resemble the shape shown in the photo.
Once the hood reaches approximately 8 inches in height, fold it in half.
Single crochet across the top edge to close.
Fasten off.
Step 4: Add the Textured Front Band
One of the cutest features in the inspiration photo is the thick folded front band.
To recreate this look:
Attach yarn to the front opening.
Work 5 rows of front-post and back-post half double crochet.
This creates a stretchy ribbed texture.
Afterward, fold the band outward to form a cozy collar.
Not only does this look adorable, but it also helps keep the baby warm.
Step 5: Add Decorative Buttons
For extra charm, sew two wooden buttons near the collar area.
Although the buttons are primarily decorative, they give the cocoon a beautiful handmade finish.
Always ensure buttons are securely attached if the cocoon will be used around babies.
Optional: Create the Bear Ear Hood
The cocoon on the right side of the image features adorable animal-inspired ears.
To make them:
Ear (Make 2)
Magic Ring
Round 1:
6 sc in ring
Round 2:
2 sc in each stitch around
Round 3:
Sc around
Fasten off.
Sew ears onto the top corners of the hood.
Instantly, your cocoon transforms into an irresistibly cute baby bear wrap.
Optional: Add Cable-Look Texture
The cocoon on the left features beautiful raised texture.
For a similar effect:
Every fourth row, replace regular hdc stitches with front-post double crochet stitches.
This simple adjustment creates a faux cable appearance without requiring advanced crochet skills.
Consequently, the finished cocoon looks luxurious while remaining beginner-friendly.
Best Color Ideas
Baby Boy
- Sage green
- Dusty blue
- Soft gray
- Cream and navy
Baby Girl
- Blush pink
- Lavender
- Peach
- Ivory and rose
Gender Neutral
- Oatmeal
- Beige
- Mint
- Soft white
- Sandstone
These colors are especially popular in modern nursery designs and Pinterest-inspired baby photography.
Tips for Perfect Results
To achieve the best finish, keep these simple tips in mind:
- Use extra-soft baby yarn.
- Avoid yarns with rough fibers.
- Check your gauge before starting.
- Keep stitches relaxed for maximum softness.
- Use stitch markers when shaping the hood.
- Weave in ends securely.
Most importantly, remember that newborn cocoons should always be used under adult supervision.
More Crochet Baby Cocoon Ideas
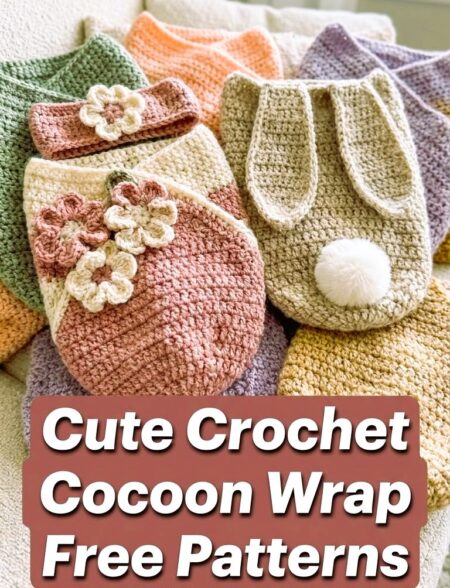
Once you’ve mastered this easy crochet baby cocoon, you can experiment with other designs.
Popular options include:
- Teddy Bear Baby Cocoon
- Bunny Ear Cocoon
- Dinosaur Hooded Cocoon
- Basket Weave Cocoon
- Cable Stitch Cocoon
- Star Baby Cocoon
- Mermaid Baby Cocoon
- Chunky Waffle Stitch Cocoon
Each version offers a unique look while using many of the same basic construction techniques.
Final Thoughts
If you’re looking for an easy crochet baby cocoon pattern that combines comfort, style, and practicality, this hooded cocoon wrap is a wonderful project to try. Not only is it beginner-friendly, but it also works up quickly and makes an unforgettable handmade gift.
Moreover, the customizable hood, textured stitches, and adorable decorative details allow you to create a truly unique piece. Whether you choose a bear-ear hood, cable-inspired texture, or classic minimalist design, the finished cocoon will become a treasured keepsake for years to come.
For crochet lovers who enjoy making baby gifts, nursery accessories, and newborn photography props, this project is a perfect addition to your crochet pattern collection.