Quilting is a timeless craft that allows individuals to express their creativity while creating functional and beautiful pieces of art.
For beginners looking to embark on their quilting journey, the Scrappy Trip Along quilt pattern is an excellent place to start.
In this comprehensive guide, we’ll explore everything you need to know about this popular pattern, from its origins to step-by-step instructions for creating your own stunning quilt.

Introduction to the Scrappy Trip Along Pattern
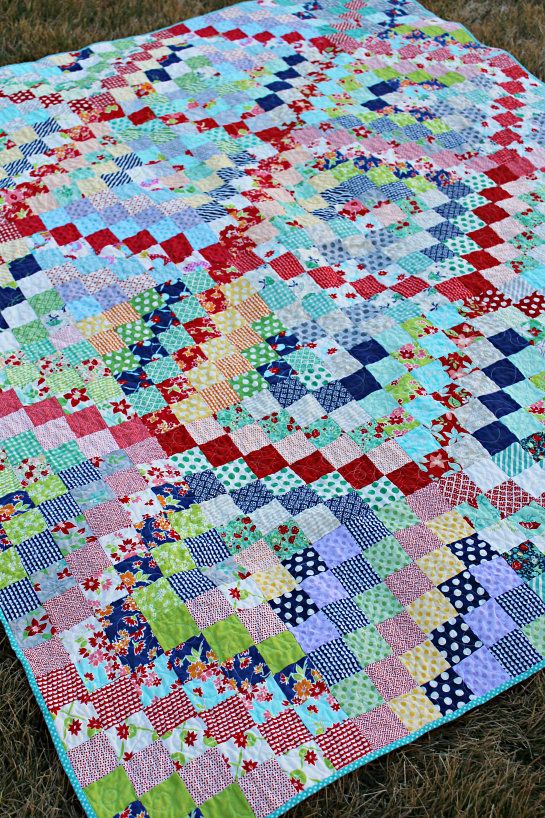
The Scrappy Trip Along pattern is a modern twist on the traditional Trip Around the World quilt pattern.
It is characterized by its use of fabric scraps arranged in a visually striking and dynamic design.
Each block consists of strips of fabric sewn together in a diagonal pattern, creating the illusion of movement and depth.
The Scrappy Trip Along pattern is beloved by quilters for its versatility and ability to showcase a wide range of fabric colors and prints.
Materials Needed
Before you begin your Scrappy Trip Along quilt, gather the following materials:
- Fabric scraps in various colors and prints
- Quilting ruler
- Rotary cutter or fabric scissors
- Sewing machine
- Thread
- Iron
- Cutting mat
- Quilt batting
- Quilt backing fabric
- Quilting pins or clips
Step-by-Step Guide
Now, let’s walk through the process of creating your own Scrappy Trip Along quilt:
Step 1: Cutting Fabric Strips
Begin by cutting fabric strips in varying widths, ranging from 2 to 3 inches wide. You can use a variety of colors and prints to create an eclectic and dynamic look for your quilt.
Step 2: Sewing Strips Together
Next, sew the fabric strips together along their long edges, alternating colors and prints to create visually interesting combinations. Press the seams open to create a smooth and flat surface.
Step 3: Cutting Blocks
Once you have sewn together several strips, use a quilting ruler and rotary cutter to cut the strips into blocks of equal width. The size of your blocks will depend on your desired quilt size and the width of your fabric strips.
Step 4: Arranging Blocks
Arrange the blocks in a diagonal pattern, alternating the direction of the strips to create a visually dynamic design. Play around with different arrangements until you find one that you love.
Step 5: Sewing Blocks Together
Once you are happy with the layout, sew the blocks together in rows, taking care to match up the seams accurately. Press the seams open as you go to create a flat and smooth surface.
Step 6: Adding Borders
To finish off your quilt top, add borders around the edges if desired. Borders can help frame the quilt and tie the design together.
Step 7: Quilting and Finishing
Layer your quilt top with batting and backing fabric, then quilt as desired. You can quilt by hand or machine, using straight lines, free-motion quilting, or any other design you prefer. Once quilting is complete, trim any excess fabric and add binding to finish the edges of your quilt.
Tips for Success
- Experiment with different color and print combinations to create a unique and visually striking quilt.
- Take your time with cutting and piecing to ensure accuracy and precision in your quilt blocks.
- Press seams open to reduce bulk and create a smooth surface for quilting.
Conclusion
The Scrappy Trip Along quilt pattern is a fun and versatile option for quilters of all skill levels. With its simple yet striking design, this pattern allows quilters to showcase their creativity while using up fabric scraps.
By following the step-by-step instructions outlined in this guide, you’ll be well on your way to creating your own stunning Scrappy Trip Along quilt. So gather your fabric scraps and sewing supplies, and let’s get quilting!


