

A Free Biscuit Quilt Tutorial with Step-by-Step Instructions
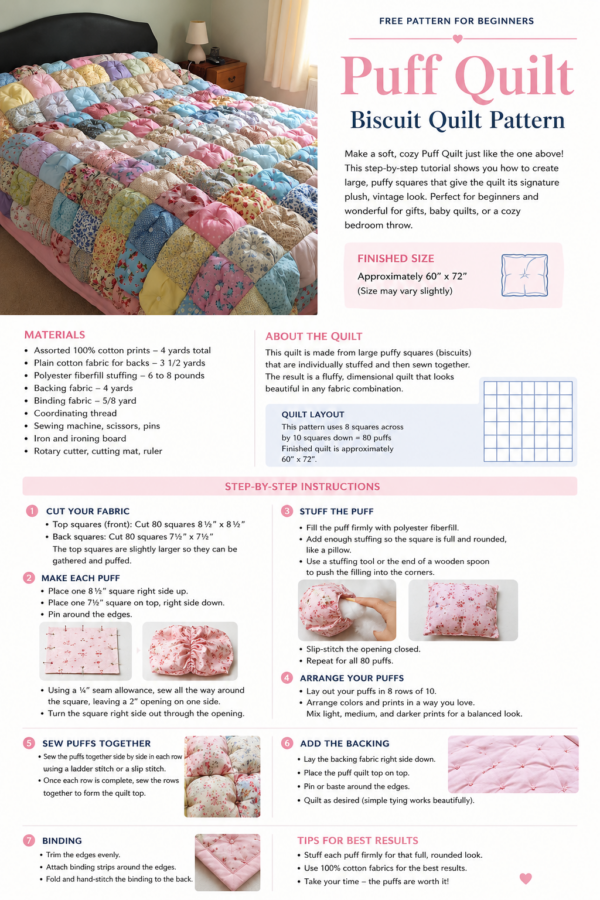
If you love soft, colorful quilts with a cozy, three-dimensional texture, this Easy Puff Quilt Pattern is a wonderful project to try. Also known as a Biscuit Quilt or Bubble Quilt, this style features individual fabric squares filled with batting, creating a beautiful raised effect.
Unlike a traditional patchwork quilt, a puff quilt has a softer, more sculptural appearance. As a result, it is especially popular for baby quilts, cozy throws, and charming bedroom décor.
In this tutorial, you’ll learn how to make a 42 × 54-inch puff quilt using simple fabric squares, lightweight batting, and basic sewing techniques. Even if you are new to quilting, the process becomes much easier once you understand how each puff is constructed.
Best of all, this free pattern is completely customizable. You can use pastel fabrics for a vintage-inspired look, bright colors for a cheerful quilt, or a coordinated collection of prints for a more modern finish.
Pattern note: This is an original tutorial created for this blog. It is inspired by the general style of traditional puff quilts and is not a reproduction of a commercial pattern.
What Is a Puff Quilt?
A puff quilt is made by sewing small fabric squares together and filling them with batting. Each square is slightly gathered or pleated, which creates the characteristic puffy, cushioned appearance.
The finished quilt looks almost like a collection of little fabric pillows. Consequently, it has a wonderfully soft texture that makes it perfect for relaxing at home.
Although the construction takes a little more time than a flat patchwork quilt, the individual steps are simple. Once you finish your first few puffs, the process becomes quite enjoyable.
Why You’ll Love This Beginner Quilt
This project is a great introduction to three-dimensional quilting because it uses basic sewing skills rather than complicated piecing techniques.
Here are a few reasons to give it a try:
- Beginner-friendly construction
- No complicated quilt blocks
- Beautiful texture and dimension
- Perfect for using fabric scraps
- Easy to customize with different colors
- Wonderful for gifts and home décor
Moreover, you can make the quilt as colorful or as coordinated as you like. A collection of small floral prints, for example, creates a lovely vintage look similar to the inspiration photo.
Finished Quilt Size
This pattern creates a quilt approximately:
42 × 54 inches
That makes it a comfortable lap quilt or small throw.
The finished size may vary slightly depending on your seam allowance, the amount of gathering, and how firmly you fill each puff.
Quilt Layout
The quilt uses:
- 7 puffs across
- 9 puffs down
- 63 puffs total
Each finished puff measures approximately 6 × 6 inches.
Materials You’ll Need
Before you begin, gather the following supplies.
Fabric
For this quilt, you’ll need two types of fabric:
| Fabric | Amount | Purpose |
|---|---|---|
| Assorted cotton prints | Approximately 2½ yards total | Puff tops |
| Lightweight cotton or muslin | Approximately 2 yards | Puff backing |
| Quilt backing fabric | 3½ yards | Back of quilt |
| Binding fabric | ⅜ yard | Quilt binding |
The exact amount of fabric will depend on how you arrange your prints and whether you use scraps.
Fabric tip: Quilting cotton is an excellent choice because it is easy to cut, sew, and press. For the best results, avoid very stretchy fabrics when making your first puff quilt.
Batting
You will also need approximately:
1½ yards of lightweight polyester or cotton batting
Cut the batting into small squares before assembling the puffs.
Other Supplies
- Sewing machine
- Thread
- Rotary cutter
- Cutting mat
- Quilting ruler
- Fabric scissors
- Pins or quilting clips
- Iron and ironing board
- Hand-sewing needle
- Seam ripper
- Safety pins or basting spray
Understanding the Puff Quilt Construction
Before cutting your fabric, it helps to understand how the quilt is assembled.
Each puff consists of:
- One larger fabric square for the top
- One smaller fabric square for the backing
- One piece of batting
- A few small pleats or gathers
- A seam around the edges
The larger top square is gathered slightly so it fits the smaller backing square. This creates the space needed for the puff.
As you sew the puffs together, they form rows. Finally, the rows are joined to create the complete quilt.
Cutting Instructions
Step 1: Cut the Puff Tops
Cut:
63 squares measuring 6½ × 6½ inches
These are the visible fabric squares that will create the colorful top of your quilt.
If you are using several fabrics, divide the squares among your prints. For example, you might choose:
- 10 pink squares
- 10 blue squares
- 10 green squares
- 10 yellow squares
- 10 floral squares
- 13 assorted prints
You do not need to follow this exact distribution. In fact, a random arrangement often creates a charming scrappy look.
Step 2: Cut the Puff Backings
Next, cut:
63 squares measuring 5½ × 5½ inches
These smaller squares will form the back of each puff.
You can use inexpensive cotton fabric or muslin for this part, since the backing will not be visible on the finished quilt.
Step 3: Cut the Batting
Cut:
63 squares measuring 5 × 5 inches
Lightweight batting works best because it adds softness without making the quilt too bulky.
If you prefer a flatter quilt, use thinner batting. On the other hand, a slightly thicker batting will create a more pronounced puff.
Step-by-Step Puff Quilt Pattern
Step 4: Prepare the Fabric
Begin by washing and drying your fabric if you normally prewash quilting cotton.
Next, press everything carefully so the fabric lies flat. This makes cutting easier and helps your squares fit together more accurately.
Once the fabric is ready, cut all your squares and organize them into groups.
Helpful tip: Keep the top squares, backing squares, and batting separated so you can assemble the puffs efficiently.
Step 5: Make the First Puff
Place one 6½-inch fabric square right side up.
Next, place one 5½-inch backing square on top, right side down.
Then, place one 5-inch batting square on top of the backing.
You should now have a small stack with:
- Fabric top
- Backing fabric
- Batting
Pin the layers together.
Step 6: Create the Pleats
To create the puffed effect, the larger top square needs to be slightly gathered.
Begin by folding a small pleat along one edge of the top fabric. Pin it in place.
Repeat the process on the opposite edge. Then, do the same on the remaining two sides.
The goal is to make the larger top square fit the smaller backing square.
Do not make the pleats too deep. Small, even pleats will create a softer and more attractive puff.
Step 7: Sew Around the Edges
Using a ¼-inch seam allowance, sew around the entire square.
Leave a small opening if you prefer to add the batting after sewing. Alternatively, you can sew the batting inside the puff from the beginning, as described in this tutorial.
After sewing, check that the pleats are secure and the edges are closed.
Turn the puff right side out if you used an opening.
Step 8: Repeat for All 63 Puffs
Continue making puffs until you have 63 completed squares.
Although this may seem like a lot of pieces, the repetitive process becomes relaxing once you get into a rhythm.
For best results, try to keep the pleats similar in size. That way, the puffs will look more uniform when you join them together.
Assembling the Quilt
Step 9: Arrange the Puffs
Lay all your finished puffs on a large flat surface.
Arrange them into:
7 columns × 9 rows
Move the squares around until you are happy with the color distribution.
If you are using floral fabrics, try to spread the larger prints throughout the quilt rather than placing them all in one area.
Step 10: Sew the Puffs into Rows
Place two puffs together with their right sides facing.
Align the edges and sew them together using a ¼-inch seam allowance.
Continue adding puffs until you have a complete row of 7 squares.
Repeat this process until you have 9 rows.
Important: Take your time when matching the edges. Since puff quilts are soft and slightly gathered, the pieces may not always lie perfectly flat.
Step 11: Join the Rows
Once all the rows are complete, place two rows together with their right sides facing.
Pin the edges carefully, then sew them together.
Continue joining the rows until the quilt top is complete.
At this stage, you should have a beautiful, colorful puff quilt top with a soft, raised texture.
Adding the Quilt Backing
Step 12: Prepare the Backing
Cut your backing fabric so it is slightly larger than the finished quilt top.
Place the backing fabric right side down.
Next, place the puff quilt top right side up.
If desired, add a thin layer of batting between the top and backing for extra warmth.
Step 13: Baste the Quilt
Secure the layers using safety pins or basting spray.
Because puff quilts are thicker than traditional quilts, it is important to keep the layers from shifting while you sew.
Place the pins evenly across the quilt, especially around the center.
Step 14: Quilt the Layers Together
For a beginner-friendly finish, use a simple quilting method.
You can sew:
- Straight lines between the puff rows
- Small stitches at the corners of the puffs
- A simple grid pattern
- Or a few hand-sewn stitches in the center of each puff
Avoid quilting too densely, because the extra stitching can flatten the puffs.
A light quilting design will help preserve the soft, dimensional appearance.
Finishing the Quilt
Step 15: Trim the Edges
After quilting, trim the edges so the quilt is even.
If some puffs extend slightly beyond the others, carefully trim only the excess fabric.
Try not to cut into the puff seams.
Step 16: Add the Binding
Prepare your binding strips and sew them around the edges of the quilt.
You can use a coordinating fabric or choose a contrasting color for a more decorative finish.
A simple binding in white, cream, or pink would look especially lovely with pastel fabrics.
Step 17: Finish by Hand
Finally, hand-sew the binding to the back of the quilt.
Weave in any loose threads and give the quilt a gentle press if needed.
Avoid pressing the puffs too firmly, since excessive heat or pressure can flatten the texture.
Helpful Tips for Beginners
Choose Lightweight Batting
Lightweight batting is easier to sew and creates a softer puff.
If you use very thick batting, the quilt may become difficult to handle.
Keep Your Pleats Consistent
Even pleats help the puffs look more uniform.
However, they do not need to be perfect. Small variations are part of the charm of a handmade quilt.
Use a Walking Foot
A walking foot can help move the layers evenly through your sewing machine.
This is especially useful when quilting the finished puff quilt.
Test One Puff First
Before cutting all your fabric, make one sample puff.
That way, you can check the size, fullness, and appearance before continuing with the entire quilt.
Take Your Time
Puff quilts involve many small pieces, so patience is important.
Fortunately, the process is repetitive and easy to break into smaller sessions. You can make a few puffs at a time and gradually build your quilt.
Color Ideas for Your Puff Quilt
One of the best things about this pattern is how easily you can customize it.
Pastel Cottage Style
Use soft pink, blue, yellow, lavender, and cream fabrics for a delicate vintage-inspired quilt.
Scrappy Floral Quilt
Combine small floral prints with coordinating solids for a charming country look.
Modern Neutral Quilt
Choose beige, cream, gray, and soft blue for a more minimalist design.
Bright and Cheerful Quilt
Mix turquoise, coral, yellow, pink, and green for a colorful statement piece.
Christmas Puff Quilt
Use red, green, cream, and white fabrics to create a festive holiday quilt.
Frequently Asked Questions
Is a puff quilt difficult for beginners?
Not necessarily! The construction is repetitive, and the basic sewing techniques are simple. However, making a full quilt takes time because there are many individual puffs.
Can I use fabric scraps?
Yes! Puff quilts are perfect for using fabric scraps, especially if you enjoy a scrappy or vintage look.
Can I make the quilt smaller?
Absolutely. For a smaller quilt, simply reduce the number of puffs.
For example:
- 5 × 5 puffs = approximately 30 × 30 inches
- 6 × 6 puffs = approximately 36 × 36 inches
- 7 × 9 puffs = approximately 42 × 54 inches
Can I make a larger quilt?
Yes. Add more rows and columns to create a larger bed quilt.
Keep in mind that a larger puff quilt will be heavier and may require more time to assemble.
Can I wash a puff quilt?
Yes, but always follow the care instructions for your fabrics and batting.
A gentle wash cycle and low-heat drying are generally safer for handmade quilts.
Final Thoughts
A Puff Quilt is a wonderful project for anyone who loves soft textures, colorful fabrics, and handmade home décor. Although it requires more individual pieces than a traditional quilt, the result is truly special.
With this free beginner-friendly pattern, you can create a cozy quilt that looks beautiful on a bed, sofa, or favorite reading chair. Moreover, the design is easy to customize, so you can make it your own with different fabrics, colors, and sizes.
Now it’s time to choose your favorite fabrics, prepare your sewing machine, and start creating your own beautiful puff quilt!