


A Free Beginner-Friendly Quilt Tutorial with a Modern Patchwork Look
If you love colorful quilts with a little bit of whimsy, this Scrappy Heart Quilt is a wonderful project to add to your sewing list. The design combines a bold black background, a large heart, and colorful patchwork accents to create a quilt that feels both modern and handmade.
Inspired by the playful arrangement of colors and geometric shapes found in traditional scrap quilts, this original pattern is designed to be approachable for beginners. You will work with simple squares, half-square triangles, and an easy heart appliqué. As a result, you can create a beautiful quilt without having to piece a complicated curved design.
The finished quilt measures approximately 60 × 72 inches, making it a lovely throw for a sofa, reading chair, or guest bedroom.
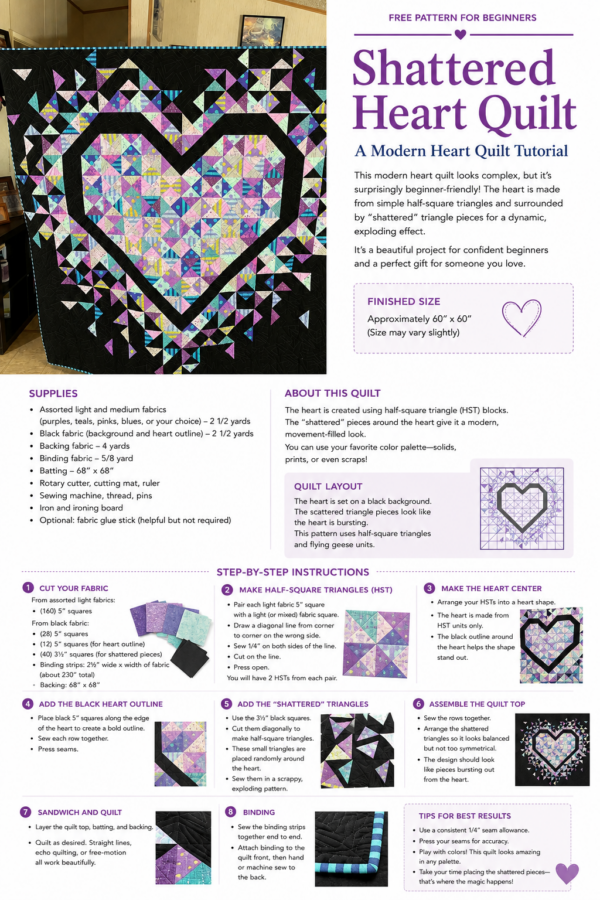
Best of all, this quilt is a wonderful way to use your favorite fabric scraps. Floral prints, small geometric designs, pastel cottons, and bright solids can all work beautifully together.
Pattern note: This is an original quilt design created for this tutorial. It is inspired by the general aesthetic of the supplied photograph, but it is not a reproduction of a specific commercial quilt pattern.
What Makes This Quilt Special?
The inspiration for this design comes from the contrast between a dark background and colorful patchwork. The black fabric creates a dramatic frame, while the heart adds warmth and personality.
Rather than using a complicated block arrangement, this beginner version combines a few simple techniques:
- A large heart appliqué
- Colorful half-square triangles
- Simple scrappy squares
- A narrow inner border
- A wider outer border
- A decorative scrappy binding
Together, these elements create a quilt with a similar artistic spirit while keeping the construction manageable.
Finished Quilt Size
The completed quilt measures approximately:
60 × 72 inches
This size is suitable for a throw quilt or a small twin-style decorative quilt.
The finished design includes:
- A large heart measuring approximately 32 × 32 inches
- A colorful patchwork background
- A black inner border
- A wider black outer border
- A scrappy binding
The final measurements may vary slightly depending on your seam allowance and quilting.
Materials You’ll Need
Before you begin, gather the following supplies.
Fabric
| Fabric | Amount | Purpose |
|---|---|---|
| Black quilting cotton | 4½ yards | Background and borders |
| Assorted colorful scraps | Approximately 2½ yards total | Heart and patchwork accents |
| Binding fabric | ⅜ yard | Quilt binding |
| Backing fabric | 4½ yards | Quilt backing |
For the colorful fabrics, try combining:
- Pink
- Purple
- Aqua
- Turquoise
- Yellow
- Green
- White
- Small floral prints
- Geometric prints
You do not need to use all of these colors. In fact, a smaller color palette can create a more coordinated look.
Other Supplies
- Sewing machine
- Rotary cutter
- Cutting mat
- Quilting ruler
- Fabric scissors
- Thread
- Pins or quilting clips
- Iron and ironing board
- Seam ripper
- Fabric marking pen
- Lightweight fusible web
- Batting
- Safety pins or basting spray
- Hand-sewing needle
Understanding the Quilt Construction
This quilt is made using a combination of traditional patchwork and appliqué.
The colorful heart is created from small fabric pieces and then attached to a black background. Around the heart, additional patchwork accents create the scrappy look.
Although the finished quilt looks detailed, the individual steps are quite simple. Once you understand how to make a half-square triangle, you can use the same technique throughout the project.
Cutting Instructions
Step 1: Cut the Black Background Fabric
Cut the following pieces from your black quilting cotton:
Main Background
- 1 rectangle measuring 40½ × 52½ inches
This will form the main background of the quilt.
Inner Border
Cut:
- 2 strips measuring 2½ × 52½ inches
- 2 strips measuring 2½ × 44½ inches
Outer Border
Cut:
- 2 strips measuring 5½ × 56½ inches
- 2 strips measuring 5½ × 60½ inches
These measurements are based on the quilt top after the heart and patchwork have been assembled.
Step 2: Cut the Colorful Patchwork Squares
For the colorful accents, cut:
- 40 squares measuring 4½ × 4½ inches
- 40 squares measuring 4½ × 4½ inches in contrasting colors
These squares will be used to create half-square triangles.
You can also cut additional squares from your scraps if you want a more random, scrappy appearance.
Step 3: Cut the Heart Pieces
For the heart, cut:
- 32 colorful squares measuring 4½ × 4½ inches
- 16 black squares measuring 4½ × 4½ inches
These pieces will be arranged into a heart-shaped design.
You can use a mixture of solids and prints to create a colorful, patchwork-style heart.
Step-by-Step Scrappy Heart Quilt Pattern
Step 4: Prepare Your Fabric
Begin by washing and drying your fabric if you normally prewash quilting cotton.
Next, press everything carefully so the fabric lies flat. This will make cutting easier and help your seams line up more accurately.
Once the fabric is ready, cut all your squares and organize them into groups.
Helpful tip: Keep your black background fabric separate from the colorful scraps so you can easily identify each piece while sewing.
Step 5: Make the Half-Square Triangles
Half-square triangles are one of the most useful quilt blocks for beginners. They are made by sewing two squares together and cutting them diagonally.
For this quilt, you will use:
4½-inch squares
Place one colorful square and one black square right sides together.
Draw a diagonal line from one corner to the opposite corner.
Next, sew ¼ inch on both sides of the drawn line.
Cut along the marked line.
Open the two pieces and press the seams toward the darker fabric.
You will now have two half-square triangles.
Repeat this process with your remaining squares.
Step 6: Trim the Half-Square Triangles
After sewing, trim each half-square triangle to measure:
4½ × 4½ inches
This step is important because it helps keep the blocks uniform.
Use a quilting ruler and rotary cutter to trim away any excess fabric.
Beginner tip: Accurate trimming makes the final quilt much easier to assemble.
Step 7: Arrange the Heart
Now comes the fun part!
Lay your colorful squares and half-square triangles on a large flat surface.
Arrange them into a heart shape approximately 32 × 32 inches.
You can use the following simple layout:
Heart Layout
| Row | Pattern |
|---|---|
| 1 | Black · Black · Color · Color · Color · Black · Black |
| 2 | Black · Color · Color · Color · Color · Color · Black |
| 3 | Color · Color · Color · Color · Color · Color · Color |
| 4 | Color · Color · Color · Color · Color · Color · Color |
| 5 | Black · Color · Color · Color · Color · Color · Black |
| 6 | Black · Black · Color · Color · Color · Black · Black |
| 7 | Black · Black · Black · Color · Black · Black · Black |
This layout creates a simple heart shape using squares.
However, you can also improvise the arrangement to create a more artistic look.
Step 8: Sew the Heart Rows
Once you are happy with the arrangement, sew the squares together into rows.
Place two squares together with their right sides facing.
Sew using a ¼-inch seam allowance.
Press the seam to one side.
Continue adding squares until each row is complete.
Then, sew the rows together.
Take your time during this stage. Since the heart is the focal point of the quilt, careful sewing will help keep the shape neat.
Step 9: Add the Heart to the Background
Once the heart is assembled, place it on the black background fabric.
Center it carefully.
You can attach the heart using one of two methods:
Option 1: Appliqué
Apply lightweight fusible web to the back of the heart.
Next, position the heart on the black background.
Follow the manufacturer’s instructions to fuse it in place.
Finally, sew around the edge using a zigzag stitch or a decorative stitch.
Option 2: Traditional Piecing
If you prefer a more traditional quilt construction, you can sew the heart directly into the background using additional black fabric pieces.
This method takes a little more planning, but it creates a completely pieced quilt.
For beginners, appliqué is usually the easier option.
Adding the Scrappy Patchwork Accents
Step 10: Create the Colorful Accent Blocks
To recreate the playful patchwork look, make additional half-square triangles using your colorful scraps and black fabric.
These blocks can be arranged around the heart in a random pattern.
For example, you might place:
- A few triangles near the top
- Several colorful squares along the sides
- A small group of triangles near the bottom
- A few scattered accents in the corners
This creates a more relaxed, improvisational appearance.
There is no need for every section to match perfectly. In fact, the charm of a scrappy quilt comes from its unexpected combinations.
Step 11: Sew the Accent Blocks Together
Arrange the accent blocks into small groups.
Then, sew them together using a ¼-inch seam allowance.
Press the seams carefully.
Once the groups are complete, sew them onto the black background around the heart.
You can use a simple layout or create your own arrangement.
Adding the Borders
Step 12: Sew the Inner Border
The inner border creates a clean frame around the colorful center.
Begin by sewing the two shorter border strips to the top and bottom of the quilt.
Next, sew the two longer strips to the sides.
Press the seams toward the border.
This narrow black frame helps separate the heart from the outer patchwork accents.
Step 13: Add the Outer Border
Now attach the wider black border.
Sew the two shorter strips to the top and bottom.
Then, sew the longer strips to the sides.
Press the seams carefully.
At this stage, your quilt top should have a bold black frame around the colorful heart.
Preparing the Quilt for Quilting
Step 14: Prepare the Backing
Cut your backing fabric so it is slightly larger than the quilt top.
Place the backing fabric right side down.
Next, place the batting on top.
Finally, place the quilt top right side up.
Smooth the layers carefully.
Step 15: Baste the Quilt
Secure the layers using safety pins or basting spray.
Place the pins evenly across the quilt, especially around the heart and borders.
Because the quilt contains several layers, basting is important to prevent shifting while you sew.
Step 16: Quilt the Layers Together
For a beginner-friendly finish, use a simple quilting design.
You can sew:
- Straight lines through the black background
- Echo quilting around the heart
- A simple grid pattern
- Free-motion quilting in the outer border
If you are new to quilting, straight-line quilting is a wonderful place to start.
Keep the quilting simple so the colorful patchwork remains the star of the design.
Finishing the Quilt
Step 17: Trim the Edges
After quilting, trim the edges so the quilt is even.
Use a quilting ruler to create straight edges.
Be careful not to cut into the quilt top.
Step 18: Add the Binding
Prepare your binding strips and sew them around the edges of the quilt.
For a scrappy look, you can use several different fabrics for the binding.
Alternatively, a solid black binding will create a clean, modern finish.
Step 19: Finish by Hand
Finally, hand-sew the binding to the back of the quilt.
Weave in any loose threads.
Give the quilt a gentle press if needed.
Your beautiful Scrappy Heart Quilt is now complete!
Helpful Tips for Beginners
Start with a Small Color Palette
Although scrappy quilts can use many colors, choosing a few coordinating shades will help create a more balanced design.
For example, you might use:
- Pink
- Purple
- Aqua
- White
- Black
This combination creates a soft, modern look.
Use a Consistent Seam Allowance
A ¼-inch seam allowance is essential for accurate patchwork.
Try to keep your sewing consistent throughout the project.
Press as You Go
Pressing your seams after each step helps the blocks lie flat.
It also makes the final assembly much easier.
Test Your Appliqué Method
Before attaching the heart to the quilt, test your fusible web and stitching method on a scrap piece of fabric.
This will help you decide which finish you prefer.
Don’t Worry About Perfect Scrappiness
The beauty of a scrappy quilt comes from the variety of fabrics.
Small differences in color and print can make the finished quilt feel more personal and unique.
Frequently Asked Questions
Is this quilt suitable for beginners?
Yes! The pattern uses basic patchwork techniques and a simple heart appliqué. However, beginners should take their time with the cutting and pressing steps.
Can I use fabric scraps?
Absolutely! This quilt is perfect for using small pieces of fabric from previous projects.
Can I make the quilt smaller?
Yes. You can reduce the number of accent blocks and use a smaller heart.
Can I make a larger quilt?
Yes. Add more background fabric and increase the number of accent blocks around the heart.
Can I use a different background color?
Of course! Although black creates a dramatic contrast, navy, charcoal, cream, or even a deep purple would also look beautiful.
Final Thoughts
This Scrappy Heart Quilt is a wonderful project for anyone who loves colorful patchwork and modern quilt designs. The bold heart creates a beautiful focal point, while the scattered triangles and colorful accents give the quilt a playful, artistic feel.
Even better, the pattern is flexible enough to suit your own style. You can use vintage fabrics, modern prints, or leftover scraps from other projects.
With a little patience and creativity, you can create a quilt that is both cozy and completely unique.