


A Free Quilted Bag Pattern for Beginners
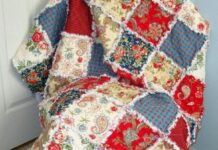
If you love colorful patchwork, vintage-inspired fabrics, and handmade accessories, this Scrappy Patchwork Tote Bag is a wonderful project to try. With its cheerful fabric squares, soft quilted texture, and comfortable handles, it makes a beautiful everyday bag.
The design is inspired by the cozy, floral patchwork style of traditional quilts. However, instead of using complicated quilt blocks, this tutorial combines simple squares into a practical tote bag.
Best of all, you can make this bag with your favorite quilting cottons, leftover fabric scraps, or a charm pack collection. Floral prints, gingham, polka dots, and coordinating solids all work beautifully together.
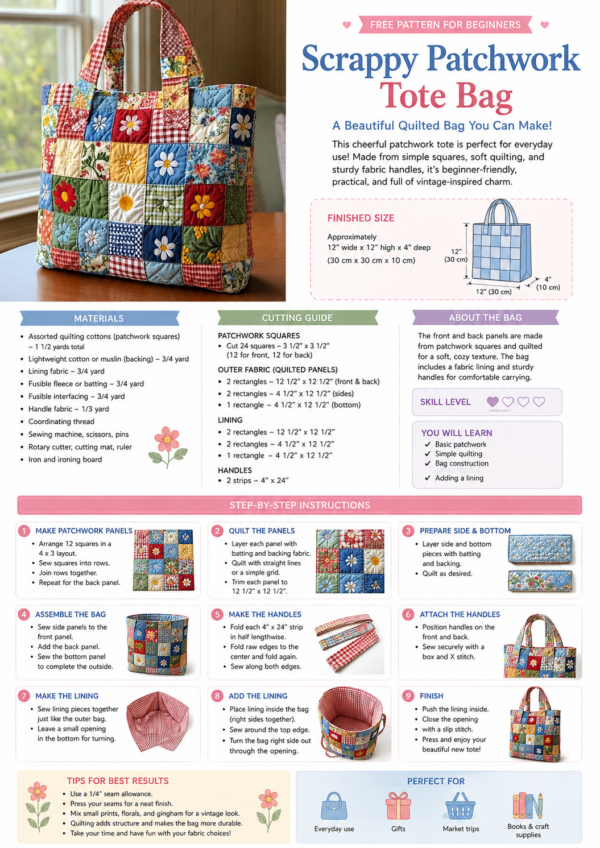
This free pattern is designed for beginners who are comfortable using a sewing machine and want to practice basic patchwork, quilting, and bag construction.
Pattern note: This is an original tutorial created for this blog. It is inspired by the general style of the supplied photograph, but it is not a reproduction of a specific commercial pattern.
What Makes This Patchwork Tote Special?
The beauty of this bag comes from the combination of simple fabric squares and thoughtful details.
Unlike a plain tote, this design has a quilted front and back, which gives it a soft, textured appearance. Meanwhile, the colorful patchwork creates a cheerful, handmade look.
You can also personalize the bag by adding:
- Floral embroidery
- Appliqué flowers
- Decorative quilting
- Vintage-style buttons
- A contrasting lining
- Scrappy fabric handles
As a result, every bag can have its own personality.
Finished Bag Size
The completed tote measures approximately:
12 inches wide × 12 inches tall × 4 inches deep
The handles are approximately 22 inches long, making the bag comfortable to carry over your shoulder.
The finished size may vary slightly depending on your seam allowance and quilting.
Materials You’ll Need
Before you begin, gather the following supplies.
Fabric
| Fabric | Amount | Purpose |
|---|---|---|
| Assorted quilting cottons | Approximately 1½ yards total | Patchwork squares |
| Lightweight cotton or muslin | ¾ yard | Quilted backing |
| Lining fabric | ¾ yard | Inside of bag |
| Handle fabric | ⅓ yard | Handles |
| Lightweight fusible interfacing | ¾ yard | Bag structure |
| Fusible fleece or quilt batting | ¾ yard | Quilted padding |
For the patchwork, choose approximately 12–16 coordinating fabrics.
A combination of floral prints, gingham, small checks, and solid colors will create a lovely vintage-inspired look.
Other Supplies
- Sewing machine
- Thread
- Rotary cutter
- Cutting mat
- Quilting ruler
- Fabric scissors
- Pins or quilting clips
- Iron and ironing board
- Seam ripper
- Fabric marking pen
- Walking foot, if available
- Hand-sewing needle
Understanding the Construction
This tote is made from two quilted panels, a pair of side panels, a bottom panel, and a lining.
The front and back each contain 12 patchwork squares. Once those panels are quilted, they are sewn together with the sides and bottom to create the bag shape.
Although the finished tote looks detailed, the construction is quite straightforward. In fact, the patchwork is one of the easiest parts because every square is the same size.
Cutting Instructions
Step 1: Cut the Patchwork Squares
Cut:
24 squares measuring 3½ × 3½ inches
These squares will create the front and back of the bag.
You will use:
- 12 squares for the front
- 12 squares for the back
For a scrappy look, mix your fabrics rather than arranging them in a strict color pattern.
Suggested Color Palette
For a bag similar to the inspiration photo, consider:
- Soft blue
- Dusty pink
- Cream
- Red
- Yellow
- Sage green
- Light purple
- Floral prints
- Gingham
- Small geometric prints
You can also use a charm pack if you prefer a coordinated collection.
Step 2: Cut the Bag Panels
Cut the following pieces:
Side Panels
- 2 rectangles measuring 4½ × 12½ inches
Bottom Panel
- 1 rectangle measuring 4½ × 12½ inches
Lining
Cut:
- 2 rectangles measuring 12½ × 12½ inches
- 2 rectangles measuring 4½ × 12½ inches
- 1 rectangle measuring 4½ × 12½ inches
Handles
Cut:
- 2 strips measuring 4 × 24 inches
These will be folded and sewn into sturdy fabric handles.
Step-by-Step Quilted Tote Bag Pattern
Step 3: Prepare Your Fabric
Begin by washing and drying your fabric if you normally prewash quilting cotton.
Next, press everything carefully so the fabric lies flat. This will make cutting easier and help your seams line up more accurately.
Once the fabric is ready, cut all your squares and organize them into groups.
Helpful tip: Keep your patchwork squares separated from the lining and handle fabric so you can work through the project more efficiently.
Step 4: Arrange the Patchwork
Lay out your 24 squares on a large flat surface.
Arrange them into:
4 squares across × 3 squares down
This creates one panel.
Repeat the same arrangement for the second panel.
You can make both sides identical, or you can create two different arrangements for a more scrappy look.
There is no need for every square to match perfectly. In fact, the charm of a patchwork tote comes from the variety of fabrics.
Step 5: Sew the Patchwork Rows
Place two squares together with their right sides facing.
Sew using a ¼-inch seam allowance.
Press the seam to one side.
Continue adding squares until each row is complete.
Repeat until you have six rows total.
Step 6: Join the Rows
Place two rows together with their right sides facing.
Align the seams carefully, then sew them together using a ¼-inch seam allowance.
Press the seams.
Continue joining the rows until you have two complete patchwork panels.
Each panel should measure approximately:
12½ × 12½ inches
If your panel is slightly smaller or larger, that is okay. Simply adjust the side and bottom pieces to match.
Quilting the Patchwork Panels
Step 7: Prepare the Quilt Sandwich
For each patchwork panel, layer:
- Patchwork panel
- Fusible fleece or batting
- Lightweight cotton backing
Place the patchwork panel right side up.
Next, place the batting behind it.
Finally, add the backing fabric.
If you are using fusible fleece, follow the manufacturer’s instructions to fuse it to the wrong side of the patchwork.
Step 8: Quilt the Panels
For a beginner-friendly finish, use simple straight-line quilting.
You can sew:
- Lines along the seams
- A diagonal grid
- Small squares
- Echo quilting around the patchwork
A walking foot can help feed the layers evenly through your sewing machine.
Keep the quilting simple so the colorful fabric remains the star of the bag.
Once quilted, trim both panels to approximately:
12½ × 12½ inches
Adding the Side and Bottom Panels
Step 9: Prepare the Side Panels
Place one side panel on top of a piece of batting.
Add backing fabric underneath.
Quilt the panel using the same method as the front and back.
Repeat with the second side panel.
Step 10: Prepare the Bottom Panel
Layer the bottom panel with batting and backing.
Quilt it using straight lines or a simple grid.
This panel will help give the tote structure and allow it to stand more easily.
Sewing the Bag Together
Step 11: Attach the Side Panels
Place one side panel against the right side of the front panel.
Align the edges carefully.
Sew using a ¼-inch seam allowance.
Press the seam.
Repeat with the second side panel.
Step 12: Attach the Back Panel
Place the back panel against the side panels, with the right sides facing.
Sew along both side seams.
Press the seams.
At this stage, you should have a tube-shaped bag.
Step 13: Attach the Bottom
Place the bottom panel against the bottom edge of the bag.
Match the corners carefully.
Sew around the entire bottom edge using a ¼-inch seam allowance.
Take your time during this step, since the corners can be a little tricky.
Beginner tip: Use clips instead of pins when working with several layers of quilted fabric.
Making the Handles
Step 14: Prepare the Handle Strips
Take one handle strip measuring 4 × 24 inches.
Fold it in half lengthwise, with the wrong side facing out.
Press the fold.
Open the strip, then fold both long edges toward the center.
Press again.
Finally, fold the strip in half once more so the raw edges are enclosed.
Sew along both long edges.
Repeat with the second handle.
You should now have two sturdy fabric handles.
Step 15: Attach the Handles
Position the handles on the front and back of the bag.
Place the ends approximately 3 inches apart.
Make sure the handles are centered and not twisted.
Sew the ends securely using a reinforced box or rectangle stitch.
For extra strength, sew an X through the center of each attachment point.
This will help the handles support the weight of the bag.
Adding the Lining
Step 16: Sew the Lining
Place the lining front and back pieces together with their right sides facing.
Sew along the side seams.
Next, attach the lining side panels.
Finally, sew the bottom panel in place.
Leave a small opening in the bottom seam for turning the bag right side out.
Step 17: Attach the Lining to the Bag
Place the lining inside the quilted bag with the right sides facing each other.
Align the top edges.
Sew around the entire opening using a ¼-inch seam allowance.
Turn the bag right side out through the opening in the lining.
Step 18: Finish the Top Edge
Push the lining inside the bag.
Press the top edge carefully.
Then, sew around the opening using a straight stitch.
This creates a clean, finished edge and helps keep the lining in place.
Step 19: Close the Lining
Finally, hand-sew or machine-sew the opening in the lining closed.
Weave in any loose threads.
Give the bag a gentle press if needed.
Your beautiful Scrappy Patchwork Tote Bag is now complete!
Optional Decorative Details
If you want your tote to look even more like the inspiration photo, consider adding a few extra details.
Floral Appliqué
Cut small flower shapes from felt or fabric.
Attach them to selected squares using fusible web.
Then, sew around the edges with a zigzag or decorative stitch.
Simple Embroidery
Add small embroidered flowers, leaves, or stems to a few squares.
This is a lovely way to create a handmade, vintage-inspired look.
Decorative Quilting
Try quilting small flowers, leaves, or curved lines on the fabric squares.
Even simple quilting can create a beautiful textured effect.
Scrappy Binding
Instead of using one fabric for the top edge, combine several small strips of coordinating fabric.
This creates a charming patchwork finish.
Helpful Tips for Beginners
Choose Quilting Cotton
Quilting cotton is easy to cut, sew, and press.
It also holds its shape well, making it a great choice for a structured tote bag.
Keep Your Seams Consistent
A ¼-inch seam allowance is important for accurate patchwork.
Try to keep your sewing consistent throughout the project.
Press as You Go
Pressing your seams after each step helps the panels lie flat.
It also makes the final assembly much easier.
Test One Square First
Before cutting all your fabric, sew a few sample squares together.
This will help you check the size and decide whether you like the color arrangement.
Use a Walking Foot
A walking foot can help move the quilted layers evenly through your sewing machine.
This is especially useful when quilting the front, back, and side panels.
Frequently Asked Questions
Is this tote bag suitable for beginners?
Yes! The pattern uses simple patchwork squares, straight seams, and basic bag construction. However, beginners should take their time with the quilting and lining steps.
Can I use fabric scraps?
Absolutely! This tote is perfect for using small pieces of fabric from previous projects.
Can I make the bag larger?
Yes. You can increase the number of patchwork squares or enlarge the side panels.
Can I make the bag smaller?
Of course. Simply reduce the number of squares and adjust the side and bottom panels accordingly.
Can I use a different background color?
Yes! Although the inspiration photo uses a colorful patchwork style, you can choose any background fabric that complements your scraps.
Can I wash the finished bag?
Yes, but always follow the care instructions for your fabrics and batting.
A gentle wash cycle and low-heat drying are generally safer for handmade quilted bags.
Final Thoughts
This Scrappy Patchwork Tote Bag is a wonderful project for anyone who loves colorful fabrics, vintage-inspired designs, and handmade accessories. The combination of patchwork squares, soft quilting, and sturdy handles creates a bag that is both beautiful and practical.
Even better, the pattern is easy to customize. You can use floral fabrics, gingham, solids, or leftover scraps to create a tote that feels completely your own.
With a little patience and creativity, you can turn a collection of fabric scraps into a beautiful everyday bag.